Primstar ReferenceBake mesh |
The following documentation is a short reference to primstar 0.9.23 This reference has not been created on behalf of Domino designs. Any erroneous description is entirely due to my lack of understanding. All screenshots have been made with blender 2.49a and primstar 0.9.23 on Windows XP. |
GUI – Bake mesh
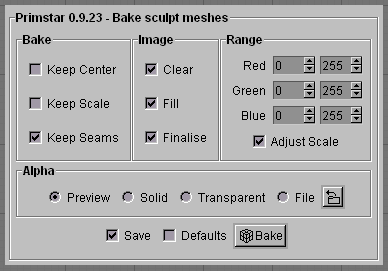
The following Popup Menu appears when you select the primstar baker from
Render -> bake sculpt meshes

The default settings of the baker are chosen in a meaningfull way, so you could in most cases end up with just hitting the “bake” button and keep the default settings. But sometimes life is a bit more complicated. In the remainder of this document you will find more in-depth descriptions about what the baker “also” can do for you. I believe it is a good idea to at least know about the options although you may not use them frequently at the end.
Bake

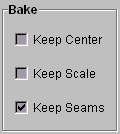
Keep center:
- Off(default): When you create a new Sculpt-mesh, its initial object center will be equal to its geometric center. During working on your object in edit mode the object center will always keep at its place. With Keep Center Off (the default settings), the object center will be adjusted to its geometric center before baking. This correction ensures that the sculptmap can use the full color range and thus the highest possible spatial resolution. As a side effect the object center will be corrected as if you had called object -> Transform -> Center new And of course the corrected geometric center is also used for the sculpt-map. In world the geometric Object center is exactly at the rez-location.
- On: If this option is checked, then the baker will keep the current object center untouched (in the blender file. In the sculpty the object center will still be placed into the center of the sculpty’s bounding box. But now the bounding box is no longer filled up to the max. Instead of this the used color range is reduced so that the visual object center gets the same offset from the geometric object center as in the blender object. The net effect is, that the spatial resolution of the sculpty degrades more and more as the current object center moves away from the geometric object center.
Notes:
- You will want to bake with Keep center On if you need the visual center of the object to differ from the geometric center. This comes in very handy when you create rotating objects like swinging doors, which need their rotation center outside of the geometric center.
Keep Scale:
- Off(default): The sculpty will be generated with a cubic bounding box (1 meter each axis). For multiple-sculptie bakes the baker determines the smallest possible bounding box that is capable to wrap around any partial sculptie in the set. Keep scale off typically creates the best results for single sculpties (the full resolution range is used). For multiple sculpty bakes the best possible resolution is calculated for the whole set. The most apparent benefit of a multiple sculpty bake is that all parts fit perfectly together on the level of vertices (all parts align!) while the full resolution is only achieved along the longest BBOX axis. In any case the single sculptie (or the whole set of partial sculpties) needs a rescaling in world.
- On: the objects scaling is preserved by reducing the color range accordingly. Only the largest Axis uses the full color range. Hence with Keep scale On the resolution of the sculptie (or set of sculpties) can degrade significantly.
Notes:
- For most scenarios a bake without Keep Scale is what you want.
- The SL exporter is capable to create a LSL script that takes care about the automatic rescaling of the sculptie (or partial sculpties) in world
Keep seams:
Quote (Domino Marama):
Improvements to the baker have made this option almost useless. When this was added, all vertices falling on a single pixel were averaged to give the final 3D position that was baked to the sculpt map. By selecting “Keep Seams”, any edges that were only part of one face or that were marked as seams disabled this averaging and just the position from the seam is used.
Since then, the baker was improved and now gives preference to the vertices closest to the bottom left of the pixel rather than taking an average. This means that “Keep Seams” only has an effect when the UV layout has multiple edges aligned together.
This situation doesn’t occur with normal sculpties, but the feature was left for cases where manual unwrapping has given problems due to multiple edges clashing. In those cases, you can mark the edge you really want as a seam and enable “Keep Seams” so it’s given priority over the others.
Image

Clear:
- On(default): the final image is cleared (all pixels set to [0,0,0] before bake)
- Off: The image clearing does not take place.You typically disable Clear when you create your sculptmap in several stages. You might want to first create the left part of a sculpty. In the first bake you will check “Clear” which will leave one half of the sculptmap totally black. Then in a subsequent bake you might want to bake the other half which will fill the former black part of the sculptmap.
Fill:
- On (Default): Your mesh might have holes. Such holes typically lead to massive distortions of the final sculptmap as they typically will be rendered to black. The baker can interpolate over the holes thus filling them with a reasonable mesh data. The final result is a full mesh without holes.
- Off: Keep holes as they are. (holes rendered to black)
Finalize:
This option prepares the sculptmap in such a way that the mirror option in world will create an exact mirror of the sculpty. As a side effect the resulting sculptmap is more compressible.
- On(default): You will enable finalize whenever you bake a sculptie in one step (just bake the sculptmap). This is the typical usage hence On is the default setting.
- Off: You will disable finalize only when you are baking a sculptmap in multiple stages. Only in the last baking step finalize should be checked. If you just bake a sculpty in one step, finalize should be checked too.
Notes:
- The name “finalize” comes from the fact, that this operation is the last thing that will be done before the sculptmap is ready to use.
- In the case you have done your final sculptmap but forgot to finalize it during bake, you still can do that from the UV/image editor by calling the script “image -> finalize sculpty” But beware: finalizing twice will destroy the sculptmap. This is so because the baker uses the alpha channel intermediately as storage area for baking information. When baking with finalize for the first time, this intermediate information is used for the “finalization” and eventually it will be overwritten with the final alpha mask (see below). If you finalize again, the baker interprets the alpha mask as baking data and will severely fail.
Range

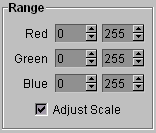
Red,Green,Blue settings:
Sculptmaps contain a set of vertex coordinates encoded as RGB-values. Each 3D axis corresponds to one axis in 3D space (x -> red,y -> green, z -> blue) The color range of each axis is [0,255] The default settings will force the usage of the best possible resolution on each axis. that is the reason why sculpties always render with perfect cubic Bounding boxes (all axes of the BBox have length 1m in world). As one matter of fact sculpties normaly can not be made smaller than 1 cm on each axis. And this is where the color range comes into play:
If you reduce the color range, the resulting sculptie will become visibly smaller because only a fraction of the available space is used. You can reduce the color space from 256 values (0,…255) down to a minimum of 4 (e.g. 0,1,2,3) on each axis. Thus the smallest possible cube you can create with this technique would be: 4/256 cm = 15.5 Microns
Note: The bounding box of the sculpty still remains the same as with full color range.
The sculptie only “appears to be smaller”.
Adjust Scale:
Adjust scale is only used in the context of the LSL exporter which also creates a script for scaling adjustments. Adjust scale also only applies when you have modified the color range (see above).
- On(default): Due to the reduced color range the visible part of the sculpty will not fill out the whole object bounding box. So at the default size (1 m along each axis) the sculpty will look smaller. With this option checked, the sculptmap will be scaled up to the size it had if the full color range where used.
- Off: If the option is turned of, the object will not be scaled to its “default size”, but it will keep the ratios as implied by the ratios of the color ranges.
Alpha

- Preview: use a silouette of the shape for better recognition of the sculptmap.
- Solid: use no Alpha at all (sculptmap will be seen as is)
- Transparent: use full alpha (sculptmap will be rendered fully transparent)
- File: use your own alpha mask (upload the mask from your file system)
Default settings
![]()
- Save : if this option is checked, all current settings will be reused when you recall the GUI the next time within the SAME blender session. If the option is NOT checked, the GUI will always popup with the default settings regardless of what you have used during the previous call of the GUI. With other words: if checked, the GUI remembers what you wanted the last time.
- Defaults : if this option is checked, the current settings will be used as default settings. The default settings are preserved over blender sessions.
The Primstar GUI – Bake mesh (link)