NHR-1 – Skeleton Structure
Free PreviewThis course takes you into the details of the Avastar Rig. You will get a deeper understanding of the Armature Data properties, how they are related to the Avastar rig, and how you can prepare the rig for creating Non Human Characters.
However we won’t tell you everything. Many aspects of Blender’s animation system still need to get explored by yourself over time.
One major aim of this course is also to give you knowledge at hand that allows you to understand what Avastar does under the hood. Thus we are looking behind the curtain instead of just telling you about magic buttons and cook book solutions. So be prepared to get into some details.
Content of Lesson 1:
- The Avastar (overview)
- The Properties window
- The Skeleton Layers
- Display Properties
- Bone Groups
- The Outliner
- Best Practices
The course is separated into 7 lessons. This is lesson 1 (updated for usage with Avastar-1.2.)
Warming up
In more detail, the Basic Skeleton of the Second Life Avatar contains 21 primary animated bones. And in addition to this it has the toes, the feet and the skull, which are not used by the default Second Life Avatar (but you can use those bones in your own custom meshes as we will see later).
The Default Avastar character
As it is very common in many 3D applications, Blender assumes in most cases that an operation in the 3D-View only affects the visible components on the screen. However, we will have to modify some bones which are not displayed by default. So, lets first create a new Avastar character and then lets proceed by preparing our view for our purposes.
But before we go into this we need to get comfortable with the usage of the Properties-Window and the Outliner.
The Properties Window (Data Properties)
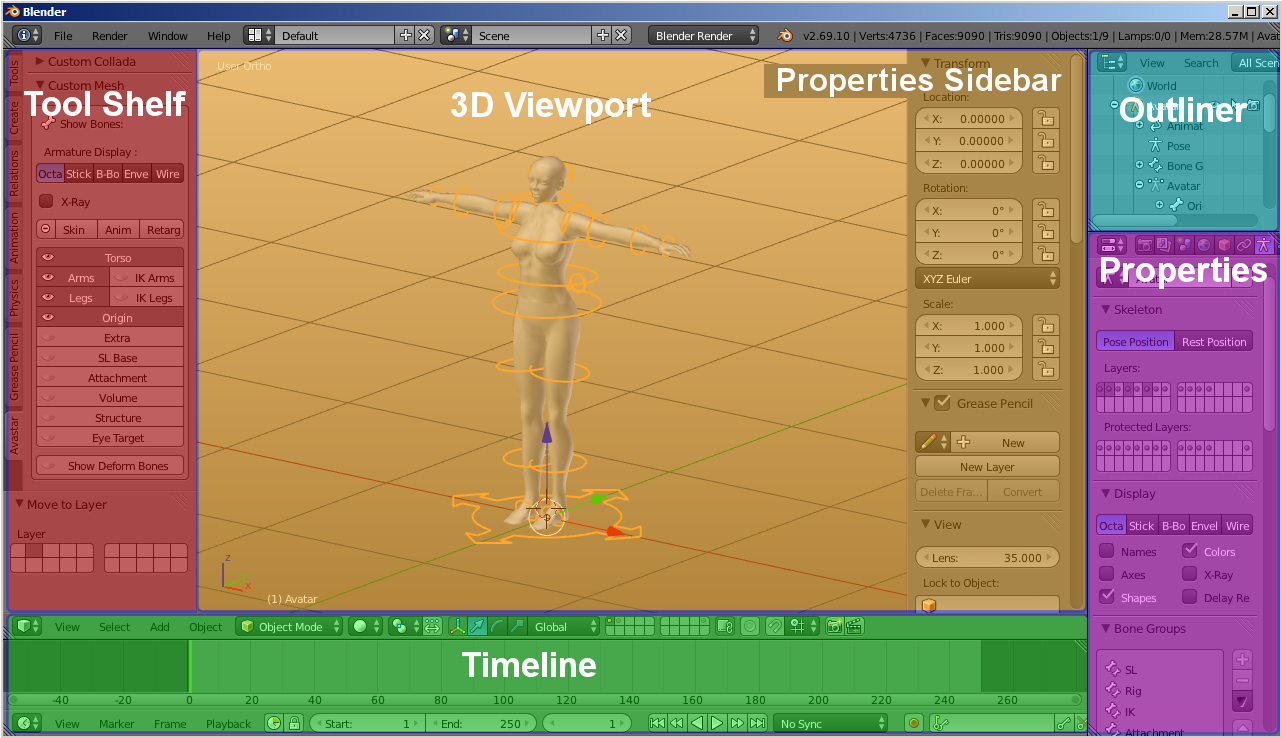
Please select the Avastar Armature in Object mode and then Locate the Object Data properties (the purple area on the right side in the image)
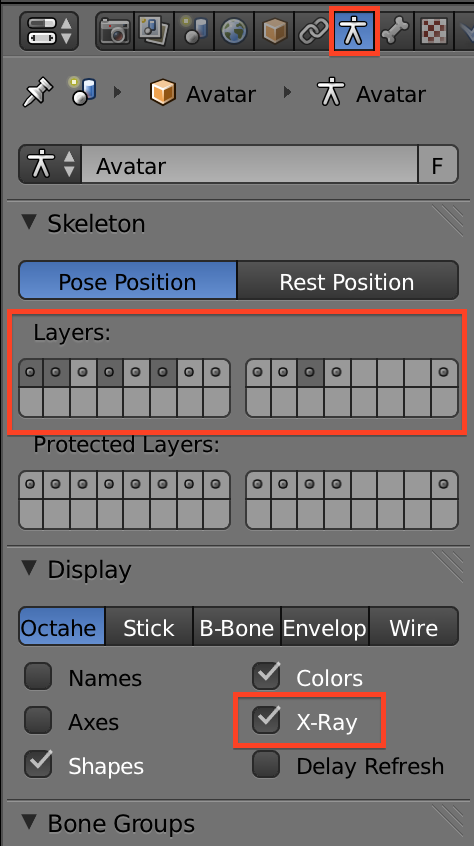
The Armature Data Properties are located in the Tab with the small stick man Icon (see next image)
The Skeleton Layers
Blender allows to group Bones into up to 32 Bone Layers. This is useful for displaying groups of related bones. Avastar reserves the first 16 Bone layers for its own purposes. Currently only 13 layers (12 layers in Avastar 1.0) are populated as indicated by dots in the layer. In my example 5 layers are visible as indicated by the dark grey backgrounds.
You can click on the layers here for enabling/disabling the visibility of the associated bone groups. Use the SHIFT key if you want to enable additional layers (or disable them). However Avastar also provides a more intuitive option for using the Rig Display panel as we will see soon.
X-Ray Visualization
By default bones are occluded by surrounding Objects. The X-Ray visualization ensures that the bones are always visible, even when they are partially or fully occluded by objects. Please activate X-Ray mode by enabling the X-Ray option as shown in the image.
Disable (Custom-) Shapes
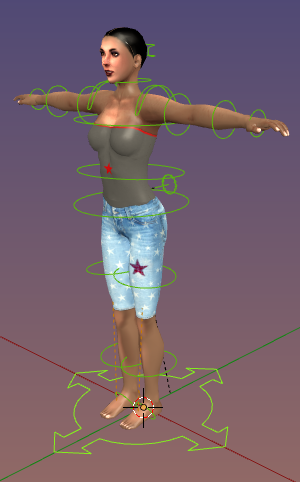
By default you see a set of green shapes (mostly circles) wrapped around various parts of the avatar. These shapes are actually Avatar bones which have been reshaped into more convenient forms for making it easier for Animators to pose the model.
For our purpose we will disable the Bone shapes for a moment and instead make the Bones visible as octahedrons. You do this by disabling the Shapes left of the X-Ray checkmark (see image above).
Bone Display Style
Right above the just discussed options you see an array of 5 buttons for controlling the display shape of the bones. Once you have disabled the Custom shape, the default style is “Octahedron”. But you can also switch to the “Stick” Style. You may take your personal choice here. I keep with the defaults and use Octahedron Style.
The Rig Display (Avastar)
Hint: The Visibility panel in the Rig Display is nothing but another representation of the Bone Layers (see above), But it is easier to use because the layers are labelled and thus easier to memorize. Please check how the bone layers display (above) change when you play with the Rig Display buttons and vice versa.
From now on we will use Avastar’s Rig Display panel because it is much easier to use. But you now also know how to access the bone layers from pure Blender.
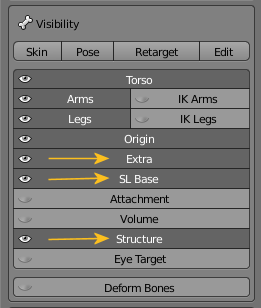
We need to activate a couple of bone layers for our ongoing work. By default the green control bones are enabled (Torso, Arms, Legs and Origin) But for our purpose we also want to see the parts Extra, SL Base, and Structure as indicated by arrows in the image above.
Display additional Bones
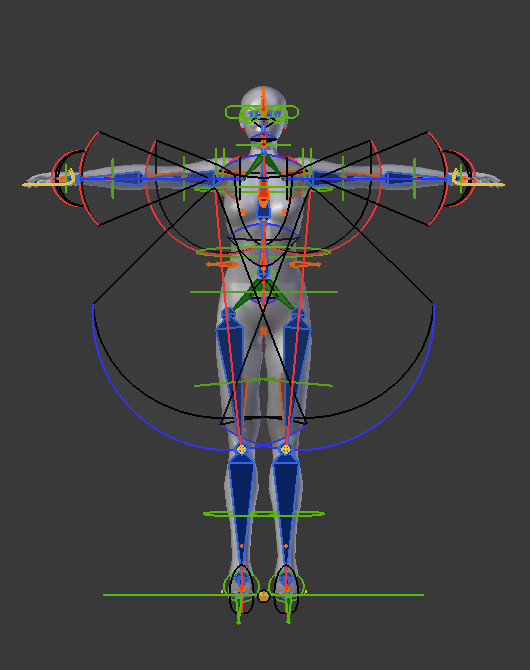
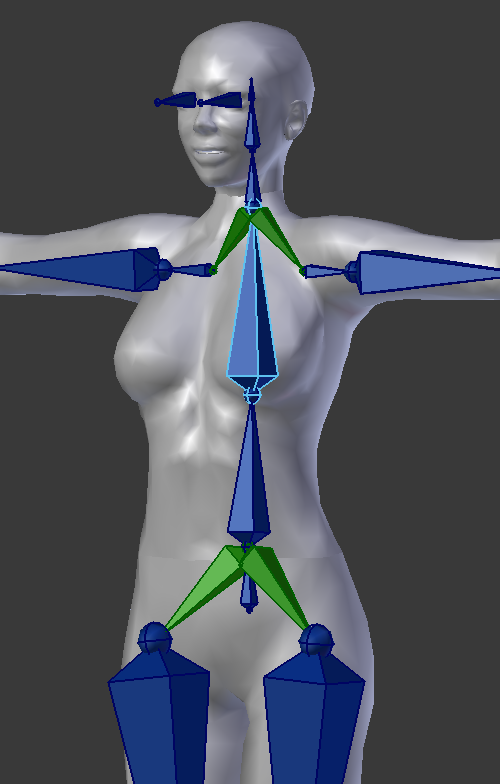
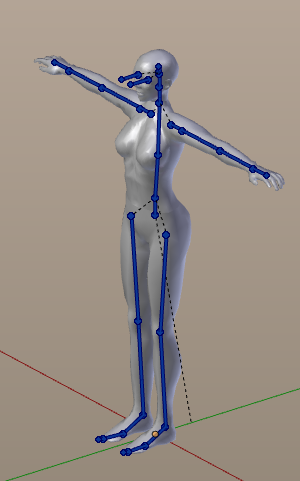
When you followed the diagram above, and when you have set the Armature into Pose Mode, then you will now see the following bone sets with specific color codes:
- The SL Base Bones (colorized in blue, see image): These bones are normally used in the virtual world for animating the character.
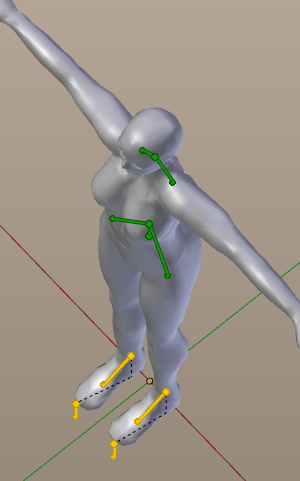
- The Extra Bones (light green, currently hidden by the SL Base bones): These are actually control bones for the foot bones and the eyes of the Base Skeleton. They perfectly overlap the corresponding Base Skeleton Bones and that’s why they not appear visible.
- The Structure Bones (light green, see image) The Structure bones are physical links between the main bones chain (the spine) and the floating chains represented by arms and legs.
Note: You will never use the Structure Bones for weighting your meshes because they have no corresponding Bones in the SL Avatar. As a rule of thumb: Blue bones are for weighting, all others are for animating.
More about Bone layers
As already indicated the Avastar rig contains 139 Bones. These Bones are organized into groups for different purposes. And each group can be displayed or hidden depending on the current task. This is achieved by sorting the groups into Bone Layers. we have already seen the Bone Layers display in the Object data Properties window (in the Skeleton panel). And we have also seen the Avastar Visibility Panel further down in the same window.
The Bone Color scheme
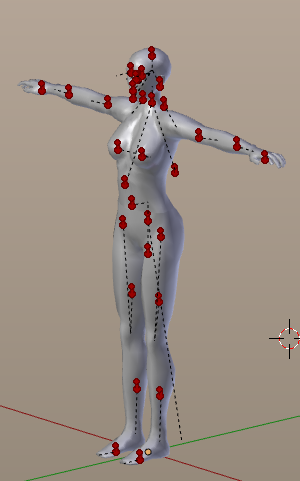
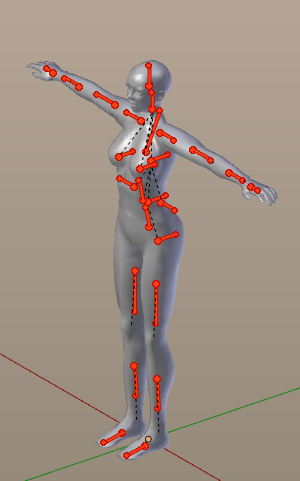
You may have noticed that the bones follow a color scheme. Here is what it means:
- Green: Controllers, used for animation.
- Blue: The Base Skeleton normally used for weighting.
- Red: Attachment points, used for animation.
- Orange: Collision Volumes, used for calculating physics behavior and used for fitted Mesh.
- Yellow: IK Bones, used for Inverse Kinematic animation.
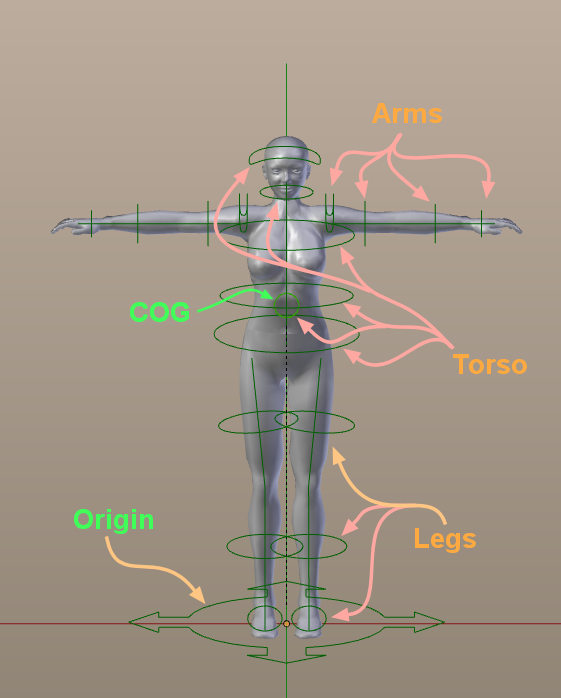
The main control Bones
Here is a more detailed description of the Bone Groups:
The main control bones are only used for posing and animating the character. These bones are divided into:
- Arms
- Legs
- Torso (include COG)
- Origin
The COG (Center Of Gravity) is used to move the character relative to the Origin. The COG can be used within your animation when you want your character to move around in space.
The IK Bones
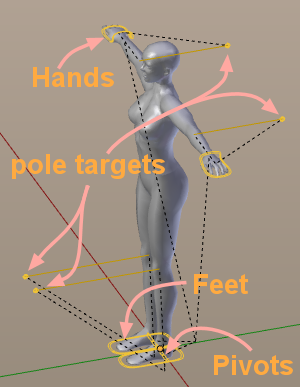
The IK Bones are only used for inverse kinematic based animations. The bones are divided into:
- Hands
- Hand Pole targets
- Feet + Foot Pivots
- Foot Pole targets
Since IK animation is a very powerful animation method we will take care of this in a separate chapter (where we will setup IK for our working model, the Horse).
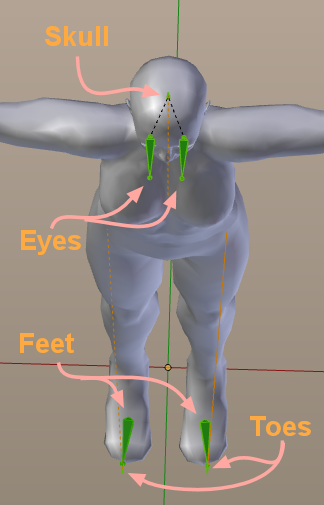
The Extra Bones
The extra control bones are very similar to the main control bones. They have been separated only because SL does not use them in the default Avatar (see note below). However you are free to use these bones as you like. The bones are devided into:
- Skull
- Eyes
- Feet
- Toes
Note: eyes are actually used for eye movement. However eye movement is mostly controlled by the viewer. So in most animations the eyes are not included. Hence we added them to the extra category.
The SL Base
However, each SL Base bone has a corresponding Control bone of the same size and at the same location. There relationship is best described as master/slave with different roles:
- The SL Base is for skinning
- The Control bones are for animating
- The SL Bones strictly follow the animations of the control bones
We have separated the blue skinning bones and the green animating bones for various reasons. Here are some:
- The SL Base bones do not follow the Blender name convention, making it hard to use Blender’s built in Mirror functions.
- The avatar skeleton is strictly specified by Linden Lab. Thus we must export the bones with the exact names and the exact configuration as specified. The SL Base bones are created according to the specifications and thus are fully compatible with SL.
- While the SL Base is fixed, we are free to use the Control bones as we like. They have been setup to work properly with Blender’s standards (also for X Mirror). We even can add more control bones if that helps our animation.
But whatever we do on the control bones side, at the end Avastar will break everything down to animate the SL Base bones. These animations will eventually be exported to Second Life.
Attachment Bones
E.g. the weighting is not always recognized and sometimes the SL Importer will reject the import of weighted attachment points. Hence we recommend highly to not weight these bones unless you like experimenting.
Animating the attachment bones is fully supported by Avastar and by Second Life.
Volume Bones (Fitted Mesh)
Avastar provides these bones as well for supporting the “Fitted Mesh” development. Actually the Volume Bones are officially accepted (by Linden Lab) as additional deform bones (bones which may have weight information).
Structure Bones
Later we added support bones for the IK animation of the feet (yellow bones).
In general you can use these bones for your animation purposes. We will refer to these bones during the ongoing course as needed.
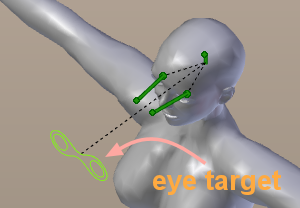
Eye Target
So the eye target operates as focus point. That is, the avatar will always look at the eye target.When you move the eye target away from the avatar, then from a certain distance on it will look straight. On the other side when you move the target very close to the eyes, you will get cross eyes (see image)
You need to take care where you place your eye target when you do your custom character!
Show Deform Bones
At the bottom of the Bone Display panel you find one additional button Deform Bones. This Button is intended to show the set of bones currently driving the mesh deformation. By default, this set of bones is the Base Skeleton of the SL Avatar. But if you add or remove bones from the mesh deformation system, they will automatically appear in the 3D View (or disappear, if you removed them) when this button is enabled.
Note: The “Show Deform Bones” button is available since Avastar-1.1
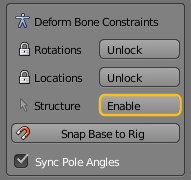
We are now almost ready to start editing the skeleton. I write Almost because if we try to select the (green) structure bones right now, nothing happens. This is a precaution to keep the Standard Skeleton intact. However we are going to create a non human skeleton and most probably will need these bones to be edited. It’s a really simple task to enable editing of these bones.
Enable Structure Select (Avastar)
However, Avastar provides a control panel from where you can do this per one mouse click. You find this panel in the Tool Shelf when you are in Edit mode.
See the Custom mesh panel, locate the Deform Bone Control section. Here you can enable/disable Structure select
By now we are done with our preparations. We can step forward to modifying the Rig for our purposes. However i want to introduce the Blender’s Outliner as well. We will use this tool to demonstrate how to enable the Structure Select manually instead of using Avastar’s Structure Select Button.
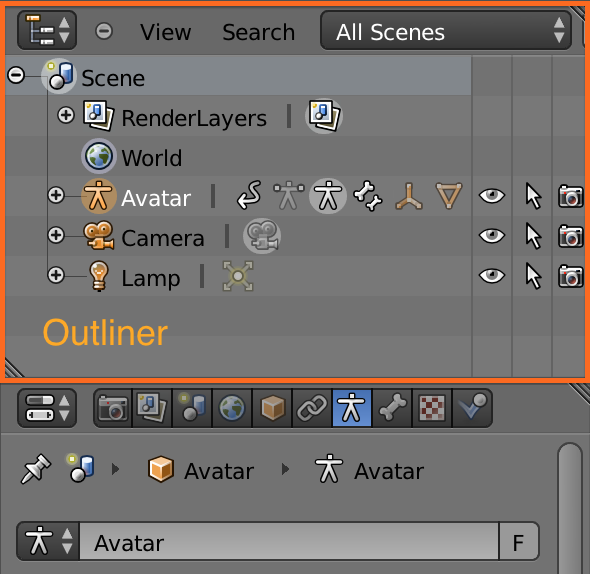
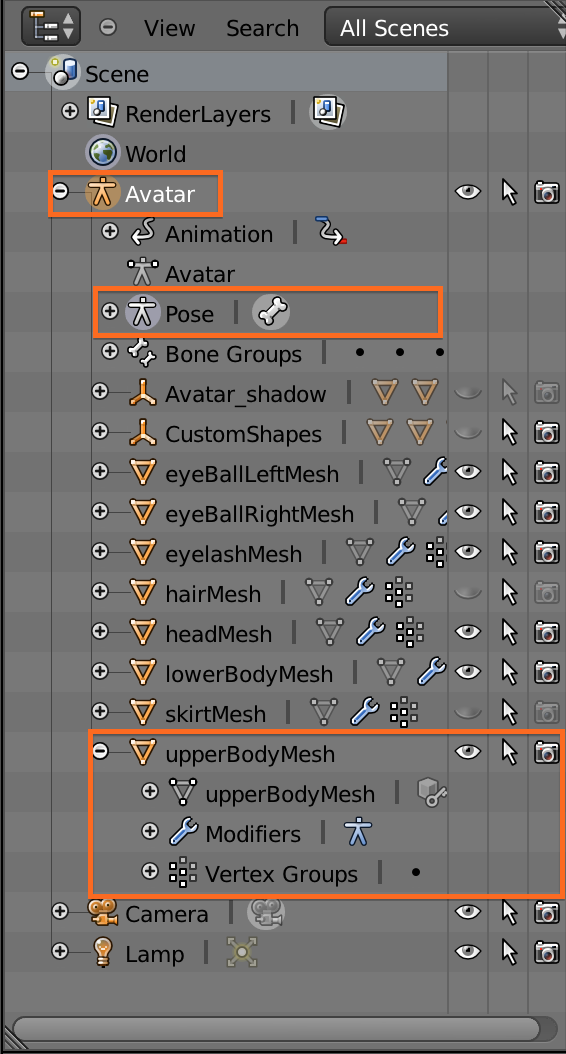
The Outliner
Indeed, aside from the objects we have in the scene, this window shows whatever other thing we might be adding, including Hierarchy connections, Actions and a multitude of other invisible stuff that Blender treats as Objects.
Outliner in Detail
I have expanded the UpperBodyMesh to see this object’s children as well. And here you see for example that even Modifiers and Vertex groups are organized as children of mesh Objects. Those are not actual Objects yet they are still in there because they are dependent by the existence of that mesh in the scene.
What we need for our skeleton editing is contained in “Pose” part of the Avastar hierarchy.
Hint: If the Pose entry does not show a plus sign, then left click on the pose icon, or on the text “Pose”. This will set your armature into Pose mode, from where you now can navigate down the bone hierarchy.
More about the Outliner Icons
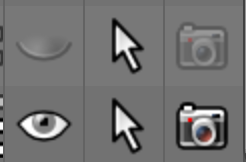
Let’s take a look at those little signs on the right hand side of the Outliner:
- The first from the left, the Eye icon, means that the object is visible in the scene. Clicking on that will toggle between showing and hiding that object in the 3D Viewport.
- The icon in the middle toggles the selectability of an object. Clicking on that icon enables/disables the ability to select the object to which it refers.
- The third icon, the little Camera, toggles that object’s visibility upon RENDERING. Hence, unless you’re going to make actual renders of your scene, this one might be useless to us.
Hint: If you just left click on an icon, then only the directly associated object is affected. But when you use CTRL + LMB then all children of an object are also affected. This is useful for example when you want to select an Object with all its children
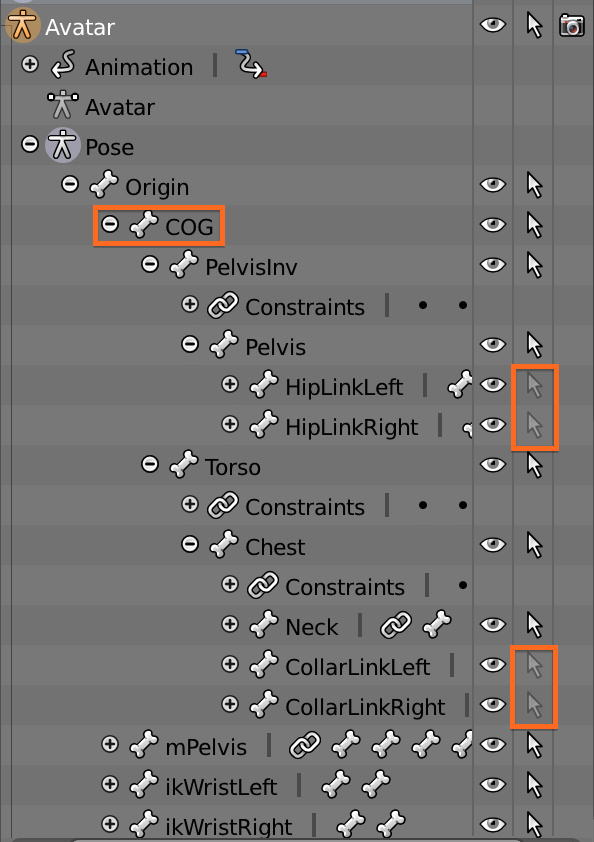
Now, in the Outliner, click on the Pose “+” sign to open the actual hierarchy of our avatar. In the picture on the right, I opened the Hierarchy tree a bit further. Always make sure to open the tree that belongs to the green Avastar Control Rig, the one that drives the SL skeleton for animation purpose:
The Control Rig
The root of the Control rig is the COG Bone. In the Outliner you find it as a child of the Origin. In the 3D View the COG Bone is the one that sticks out from the Avatar back (and has the little wheel icon). If we continue expanding the tree, under Chest, we can see the CollarLink Left and Right and….guess what? By default the selection toggle icon is disabled on those for selectability (the little arrow icons)!
That’s right, this is what we were looking for: we have to enable the selectability of these bones. After you have done the collar part, proceed with the HipLink bones that connect the Pelvis to the leg bones (below PelvisInv in the hierarchy). Now all Link bones are selectable, so that we’re ready to edit our skeleton efficiently and safely.
So, after this small excursion into the Outliner i am sure that you will step back to the Constraints panel in the Tool Shelf and just enable structure selectability from there.
Best Practice Tips
Use the Default Skeleton
When we are about to edit skeletons for any game engine that allows that, it is always a good practice to start your work with the default skeleton. Even if the size and/or shape of the default skeleton are not matching our custom character. We can do this matching while we are editing the skeleton.
Avoid Object scaling
In any case you must without any exception avoid mixing Armature Object scale and skeleton editing together. This might end up in unexpected and unwanted results (resulting in bad surprises…).
The use of the default avatar ensures a better comprehension of the skeleton’s values, SL side speaking. The resize process will be carried by the new offsets parameters we’re about to edit bone by bone for our character.
Preview on next Lesson
In the next lesson we will talk in more detail about a few properties of Bones. This may not be important for the game engine to evaluate the working order of the skeleton, but it’s the most important thing we need to take care of in order to be able to animate correctly, using the same exact parameters that SL expects to evaluate rotations when playing back animations.
When you edit the skeleton then the default poses and walk animations for the SL standard Avatar will no longer work for you. There is a compelling need to use a custom Animation Overrider for replacing the SL default animations’ by your own customized animations.
干的不错
Great introductory video! Its very clear to understand and follow. I absolutely love all of the information provided is based on all of the most recent updates to both SL and Blender versions. I’m very much looking forward to completing this course. Looks like its going to be one of the best ones yet.