Chapter I: Departure
This tutorial covers the transition from “making Sculpted Prims” to “Making Meshes” . My intention is to give Sculpty makers a set of guidelines. These guidelines shall help you to decide when to make a particular object as a Sculpty or as a mesh.There are a lot of different aspects to be kept in mind, like Prim costs, behaviour of LOD, physical interaction properties, visual quality…
Maybe the most wanted (but still not available) number will be the prim cost of a particular mesh. This number will decide at the end if a mesh is well done for our online world (saleable, practicable) or not. So we will need to talk a lot about various possible “optimization possibilities” to get our work into a good “shape”.
Right now we have only a vague measurement about how good our optimization is, but as soon as the final prim costs are fixed i will update this article and adjust it to the numbers. Until then the methods introduced here are meant as just experimental.
Departure
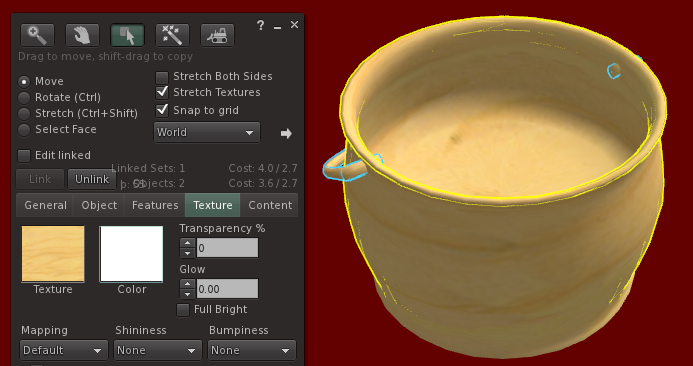
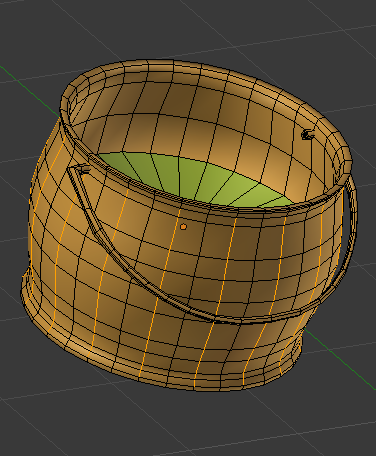
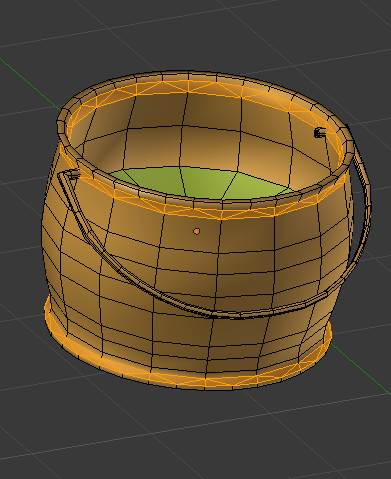
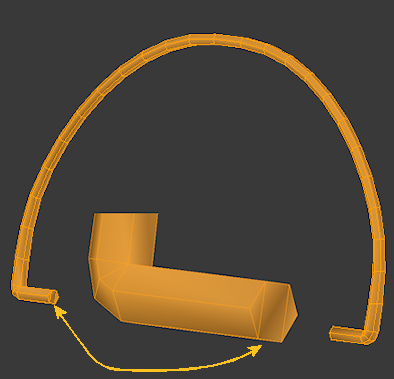
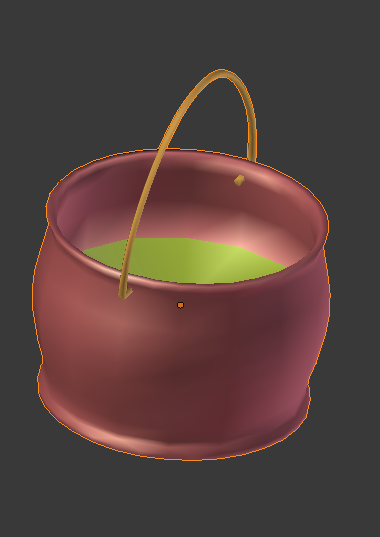
We are first going to measure our effort against the behaviour and the costs of a sculpted prim. I have choosen a simple Kettle. Thank you to Vivienne Daguerre for her kind offering of the blend file and textures. However a have modified the original object a bit so that it better fits into my tutorial. Here is the basic Object. It is made out of 2 separate Sculpted Prims, the pot itself and the handle. The rightmost image is a screenshot made on a Mesh-SIM (Note, the texturing will be updated, for now it is just a place holder):
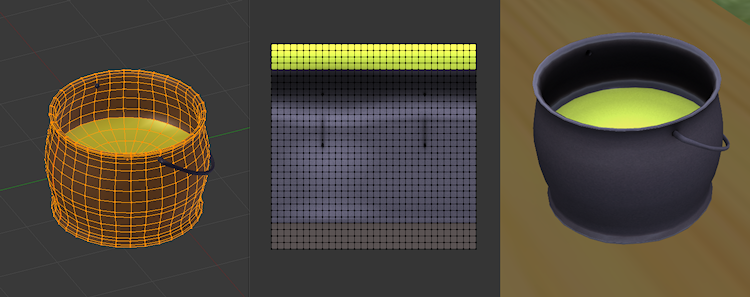
The kettle has 1024 faces (sculptmap size = 64*64 pixels) and the handle has 256 faces (sculptmap size = 16*64 pixels).
The LOD is reasonably OK and the Primcost of this kettle is just 2 (for 2 sculpties).
Now let the advanture begin. Let us start our Quest and
Make a similar kettle with a mesh and with the same or even less prim costs!
If you are a plain vanilla mesh maker, please skip that part or stop grouching about how bad sculptuies are and see what they actually can do for you in a mesh world… Here we go…
Step 1 First try
Let us start clever. the kettle above and the handle are sculpties. But sculpties are meshes too, they just come along with some special constraints… Well, let us just try what happens when we take these 2 sculpties and “meshify” them . Actually all i do for now is exporting the kettle and its handle as a Collada file.
And this is the result ( i have removed the texture because we want to focus on the shape first):
Step 2 Tweek the LOD-Generator
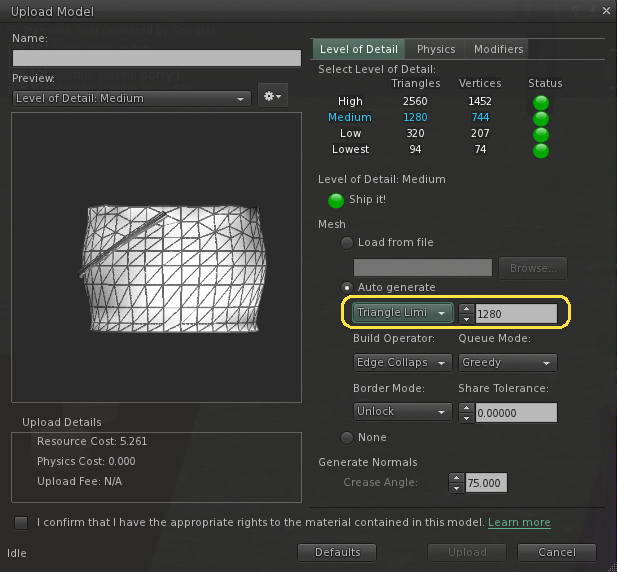
When you import the next time, please take a deeper look at the LOD section of the importer. Locate the Auto Generate section and there start playing with the triangle limits. You can configure each LOD level separately. You only need to select the LOD level (in the image i have selected the Medium LOD level), then adjust the triangle count to your wishes. In our case you get an acceptable LOD2 when you set the triangle limit to 1280 Tris. You can adjust each LOD level as you like, as long as each subsequent LOD level contains less vertices than the previous level:
|
|
Some more remarks:Auto Generate has another option “Error threshhold”. But as far as i understand it is just another scale that you can use instead of the triangle count. The effect on the texture seems to be the same. Build Operator, Queue Mode and Border Mode are explained briefly in the Mesh Import test page on the SL wiki. It may be worthwhile to get deeper into that later. Generate Normals:This feature allows you to convert a facetted surface into a smooth surface depending on the angle between its faces. This option is probably there for convenience. You will typically want to control your normals from within your 3D editor instead. Hint: A sculpty has only a smooth surface by definition. We will see later, how we can get really sharp edges on the model without using ugly tricks like duplicated loops… |
| Tip: You should take care to tweek the LOD settings such that the number of vertices is reduced roughly by a factor of 4 for each LOD level. That seems to give you the least Prim costs. Later we will see that adding a Physics shape may also affect the prim costs. Exact values are currently not determinable. I will add more about prim costs when this data is available. |
|
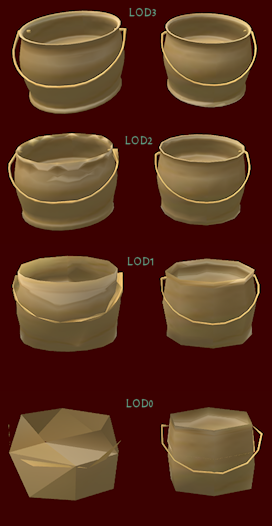
So after tweeking the LOD-generator, we see that we can get slightly better:
But this is still not very convenient result. So we will try next to make our own LOD versions.
Step 3 Mimic Sculpty LOD
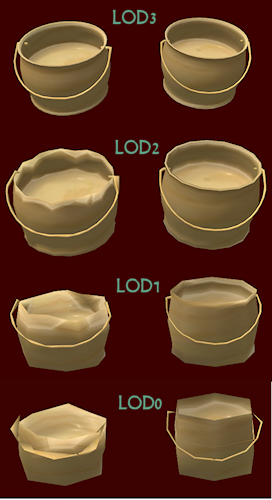
So let us sit back for a moment and look at how LOD is calculated for Sculpted Prims. Then maybe we want to try if we can get the same LOD behaviour as we have for the sculpty by creating our own LOD files according to how sculpty LOD is implemented ? The approach is straight forward. We still have the “old” sculpty mesh on which or kettle is based. And that mesh can be LOD reduced easily by simply removing every secnd row/column of vertices… We end up with 4 “Sculpty like” LOD levels as follows:
Ok, I “cheated” a bit. When you look at the lowest LOD0, you see that i made it slightly better than the original LOD0 level. I kept 8 faces around the circumference while the sculpty LOD0 only has 6 faces along the circumference. But hold on!
This is not “cheating”… This is “optimizing” !!! Yep. Here is the first really important thing to know about meshes:
Fact I: You can optimize the LOD behaviour to your needs.
You can decide if you want to have LOD at all.
Or you can decide to make very radical LOD settings.
Well, you could go to the extreme and even use LOD as a method
for creative artwork, like for example a box been closed when seen
from far away, but opened when approaching it…
You can do all of that with meshes. With sculpties you are bound to the automatic LOD calculations… But beware, this new freedom has a price, see further down!
For now let us procced and upload and examine how our mesh object changed after we defined the differnt LOD’s as described above. So we may expect to see a slightly better LOD when going really far away. We will later see that there is still much room for optimization here. But let us do one step after the other.
Here is our result:

So apparently we can make meshes as good as sculpties. But why would we want to do this ? Why not just keep with the sculpty and be happy ? And can we get even better with mesh than with Sculpties (yes we can, see fact I above)? And … what about the costs of this mesh compared to the costs of the Sculpty ?
As i said, one step after the other. Keep patient…
First let us check the prim costs. Rezz the kettle and see how many Prim equivalents we have to give away for it:
So from the block of 4 values i believe the upper left value is the one we have to look at. So this kettle has a prim cost equivalent of 4… oh, this is unexpectedly high… You may be tempted to ask: “Now after we worked hard to make all these extra LOD meshes and uploaded 4 files instead of one, we get something equivalent to a sculpted prim, but we have to pay 2 times more for it compared to 2 sculpties (kettle and handle) ?”
This smells a bit like “maybe we have overlooked something…” And yes! We need to know about one very important detail, namely the physics properties of our object.
Step 4 Physics Shapes
We did not specify any physics properties and this (currently) causes the importer to silently use a very detailed physical definition of the object. That means, your object will react on physical interactions (for example bouncing into it, walking over it… And here we have the cause of the high primcosts. Having a very detailed and acurate physics shape will cause the physics engine on the server to do an awfull lot of calculations to determine if another object bounced on our mesh.The more acurate we define the physics boundaries of our object the more reaöistic it will react.
Fact II: You can optimize the physics shape to your needs.
You can specify how acurate the physics engine shall handle your object.
In most cases it is sufficient to use a very rough approximation of your
visual model for the physics model.
The less complex we choose the physicsl model, the less it will cost to rezz it.
You can have a very acurate physics model if you need it. But that is a real
cost booster.
Here is the Physics shape of our kettle as it is used right now:

- The leftmost shape is what the mesh importer calculated from the LOD3 shape of the mesh. Note that the dip in the kettle has been closed and Actually what you will get is a very primitive physical shape (a convex hull) which has no holes in it but roughly follows the outlines of your object.. Having convex shapes makes object-object collision calculations very easy.
- The middle image shows how the physics boundary is placed on the kettle
- The rightmost picture shows that a bunch of physical objects seem to hover over the kettle and do not fall into it. That is because the physics shape is Convex
Often you do not at all need the accuracy as used by default. And sometimes you will want to have more accuracy, or even a differnet physics behaviour than predicted by the visal appearance. And fortunately you can define your own physical shape. Now we can make te physics shape a bit easier using less faces around the circumference:
Obviously the physics mesh has got an influence on the prim costs. But still we see the costs for this mesh are more than the costs for the sculpty. Can we get further down ? I think so. Let us examine the model. It is made of 2 sculpted prims. And it translates to 2 mesh objects. Let us take a deeper look at the physics object. Do we really need the handle ? We can live without it regarding the physics. So we want to remove it. But that is not so easy! Because the handle is an object it MUST have a physics mesh. So our next level of optimization is:
Step IV: Merge the Objects
Now we have mesh. And many constraints of Sculpted Prims no longer apply. For example the number of faces is no longer limitted.
Fact III: You can use as many or as few faces as you need.
Any number of faces is allowed (from 1 up to about 64000)
You can use triangles as well as Quads
You can use submeshes (2 or more not connected meshes)
So let us get back to our model and make it one single object, then remove the handle from the physics mesh and see:
Step V: Optimize the mesh
Now we are at the end of Sculpted prims. Here is where we eventually enter the wonderfull world of Meshes. We already have touched a few exciting differences between Sculpted Prims and meshes (see Fact I,II,III above). Now we have to go deeper into detail. The challenge is to keep the look of the kettle as good as possible (or maybe even make it better if that can be done) but at the same time reduce the number of faces as much as possible. Here we will find a lot of play ground and a lot to learn about 3D modelling. let us begin… NOW!
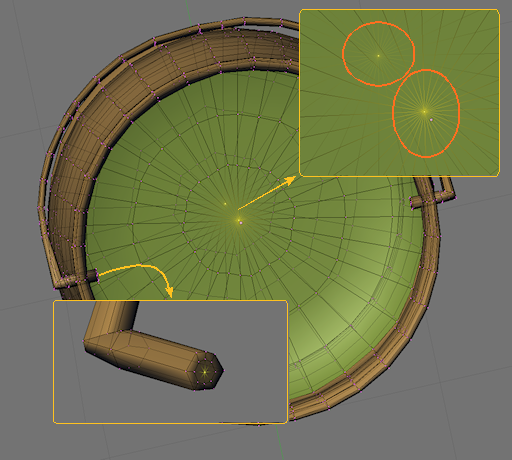
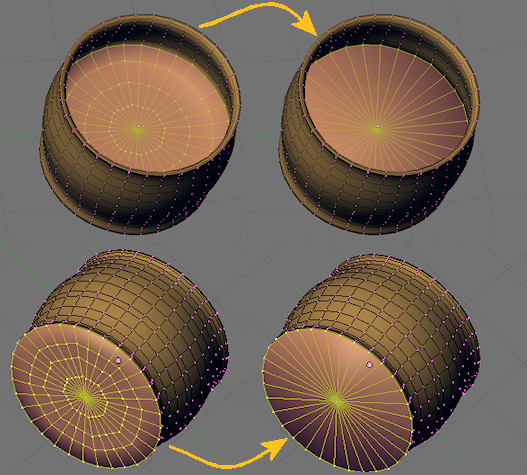
First let us get rid of the most annoying issue with Sculpted Prims. The poles! We do not need them any longer. We can remove them by removing all duplicated vertices on the mesh.
Fact IV: Collapsed vertices are mostly unwanted!
You can remove the poles on your objects.
Remember that the poles are artefacts coming from the way
how sculpted prims have to be constructed.
And rember what a mess you get when texturizing around poles ?
You can forget this problem now. In almost any case it makes sense
to remove any collapsed vertices…
However there are situations where collapsed vertices make sense,
e.g. when you want to combine sharp edges with smooth faces. But
this will be discussed elsewhere (it will be adressed in the Mesh IV tutorial)
Now we can further optimize the mesh and remove obsolete faces. For example the end points of the handle use so many faces which we really do not need. We can remove them too:
Here we saved 8 faces and another 8 faces on the other side of the handle.
Fact V: Adding edge loops for LOD is not needed!
Sculpted Prims have a very clear and understandable way to handle
LOD (Each lower level removes each secnd edge loop in x, any y
and thus reduces the number of verts by a factor of 4. Hence you
need additional edge loops in order to keep surfaces from collapsing
in the next lower LOD.
This is no longer needed with Meshes. We now can create our own
highly specialised and optimized LOD meshes as we need!
However there are situations where collapsed vertices make sense,
e.g. when you want to combine sharp edges with smooth faces.
But this will be discussed elsewhere (it will be adressed in the Mesh IV tutorial)
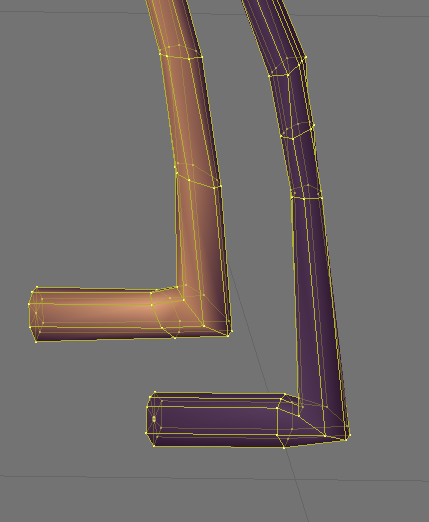
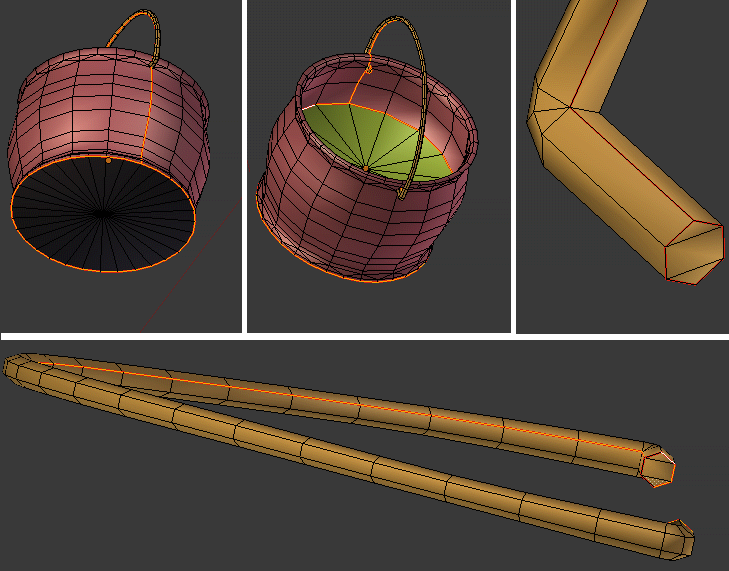
We also can smooth the mesh as we want, because the spacial resolution of meshes is almost infinite compared to what we are used from Sculpties. In other words, we can place our vertices where we want with very high accuracy. So we no longer suffer from unexpected rough surfaces. We will get exactly what we have modelled! Here i smoothed out the handle a bit and optimized the number of used faces (the dark mesh is the original from the Sculpted Prim, the copper mesh is the new smoothed mesh (and it is still not as nice as it can be, see further down):
After we have removed all unnecessary edge loops, the kettle looks like this:
And this is the now optimized kettle:
Step VI: Create the LOD meshes
Remember for one moment our very first try. We can take our mesh and simply let the LOD-meshes be generated automatically. That may or may not lead to acceptable results. In all my attempts to generate some reasonable and cost efficient LOD i failed so far. Maybe it is worthwhile to examine the LOD-generator in more detail. But this is another story. So let us concentrate now on how to reduce our mesh.
We have to take care about 3 issues now. Unfortunately we can not get away with them separately, so i first will introduce them here and i will recall them wherever it makes sense:
- Radical LOD reduction: The reduction for each LOD should be as radical as ever possible. A very good rule of thumb is to reduce by a factor of 4 for each subsequent level. So we should aim to only see about 280 triangles on LOD2, 70 triangles on LOD1 and 18 triangles on LOD0. Now we have already reduced LOD3 quite a bit, so it will become very hard to achieve those numbers and we will not be able to get there without reducing the visual experience. However in this tutorial i will not go to the limits and i will keep the LOD reductions moderate. This works quite well because the kettle is only a small object and small objects are not very expensive.
- Number of Material settings: We have to take care that the material settings of the kettle remain intact in all LOD shapes. That means: each material i have used on the LOD3 mesh must(!) also appear somewhere on the lower LOD meshes. This is an unbreakable rule and it will be tested by the uploader. So for example if you wanted to remove the handle of the kettle in LOD0, then the importer will complain about incompatible texture face count. The only way to get out of this is to keep at least one triangle assigned to the texture face in question. You can hide this triangle somewhere and/or make it very small, if it does not add to the visiual epxperience.
- UV-Unwapping: We have to take care about UV-unwrapping. It is evident to know that the UV-map used on the LOD3 mesh will be reused on all subsequent LOD levels. And that means, whatever UV-map you used for the LOD3, you have to take care,that the subsequent LOD meshes can be texturized with the same UV-map. That may sound complicated first, but (at least with Blender) it is not a big problem to get compatible UV-maps as long as the meshes look roughly similar. But since that is actually what we want, we problably are on the safe side here. However note that you are not obliged to use the same shapes for all LOD meshes. So you could make some creative usage of objects changing their shape with distance. But that is also another story and will not be covered here in detail.
So, in order to prepare our mesh for LOD creation, we first…
Define the seams
The seams define and separate different regions of the mesh from each other. Seams are actually used in multiple ways and we will use them in our context mainly for 2 reasons:
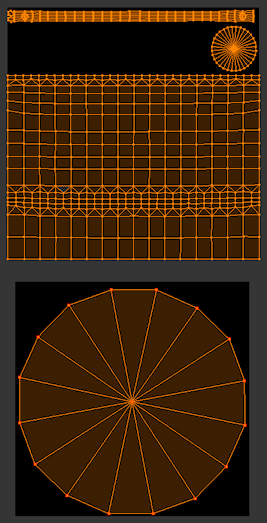
- Seams are very helpfull for UV-unwrapping. In fact when we try to unwrap the kettle without defining seams, we end up in a complete mess. If you look where i have actually set the seams you may instantly get an idea how to use them for your own objects.
- We have used 4 materials on our kettle. Defining seams makes it easy to keep the different material areas visible during our LOD reduction activities.
So here are the seams and these are mostly dictated by the material distribution:
Remember that the sculpted Prim has only one seam which would run from the center of the kettle bottom to the center of the kettle interior ?
Fact IX: You can have your own UV-map
With meshes you have the full freedom to define your own UV-map.
That means, you are no longer forced to reuse the given UV-map
of Sculpted Prims. And that means you can unwrap your objects
exactly as you want and according to the shape itself.
On the downside, you must know how to make good unwraps.
Please note that i have added one seam which runs vertically through the kettle body. This seam is needed to keep the UV unwrapper from doing weird things. You can try what happens without that seam and compare to the results i will show you in a moment. Also note that i have added 2 extra seams at the end caps of the handle. This is again only done to give a good hint to the unwrapper tool. The remaining 2 seams along the kettle bottom and along the kettle interior are mostly needed to mark where we have to take care on the different LOD levels. But they also help the UV-unwrapper to make a nice and easy texturizable UV-map for us.
Unwrap the mesh
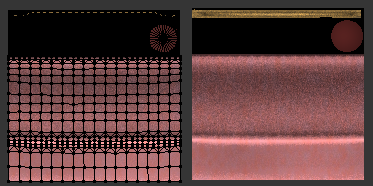
After we have marked the seams, we should now unwrap the mesh. This is not relaly needed at this moment for making the LOD meshes, but it is a good idea to create the UV map now and see if the unwrap is god, or maybe we ned to tune the kettle mesh itself to get better results and avoid possible problems. Maybe we also need to add more seams.
But i have given you already a good set of seams here. I probably will make another tutorial about unwrapping and there i migt get deeper into seams…
Here is what the Blender unwrapper produces mostly automatically:
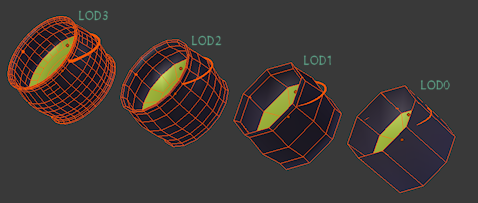
Create the LOD2 mesh
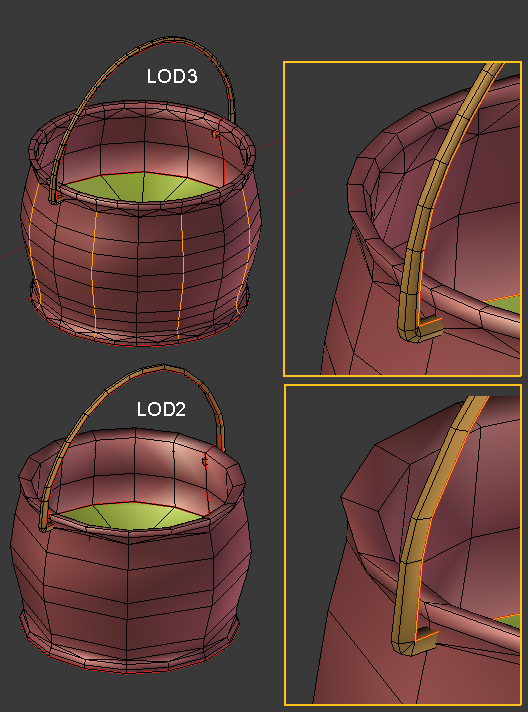
I first make a copy of the LOD3 mesh, then i reduce edge loops just like i already did when i optimized the LOD3 shape.
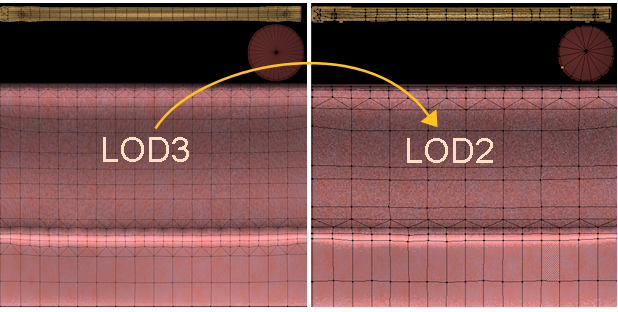
I reduced the handle from 6 faces to 4 faces around its circumference. And i removed every secnd vertical edge as marked on the LOD3 kettle (upper part of the picture). I also removed some horizontal edges. The result (seen on lower part of the image) is till very well defined. But we start seeing degradations now. But this does not make much trouble because the LOD2 mesh will only be used when the kettle gets smaller (or further away). But still be carefull. You will want to keep the overall shape as intact as possible again.
Then i readjust the seams so that they cut the kettle into the same pieces as we have used in the LOD3 shape. Now let us unwrap this new kettle and match the new UV-map to the already existing map from LOD3:
Now you can see why i have choosen to make the initial UV-map rectangular. It is not too complicated to do this adjustment and keep the kettle look almost identical on both LOD levels.
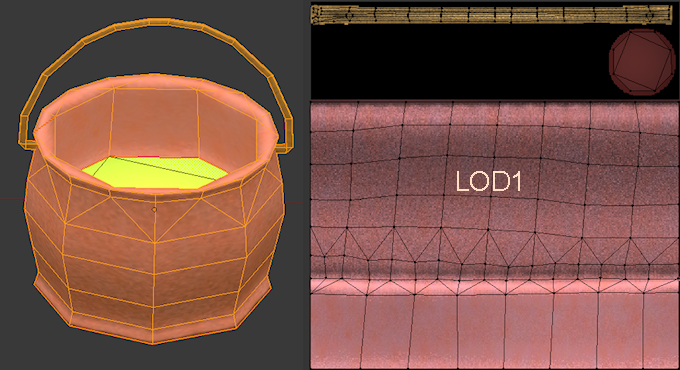
We continue as before and create LOD1. Here is the mesh and the adjusted UV map:
I have again significantly reduced thehandle and the kettle body. But still i have clearly defined the kettle shape. I will change this for the LOD0 mesh. The main reason is that the LOD-0 mesh creates the most resource costs. this is so because the LOD0 mesh is always visible independent on the distance between the camera and the object. So making this mesh very small will result in a better price.
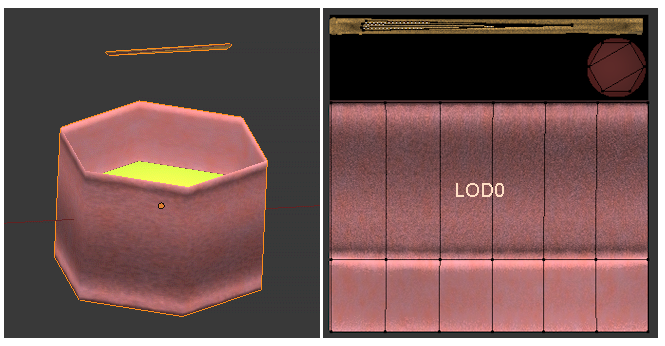
If we take care we even can find a LOD0 which matches perfectly to the body. In our case i have oversimplified the mesh:
But it still is good enough for our purpose. We now have only 21 remaining triangles. Note that this version of the mesh has its interior at the top edge of the kettle. This is not optimal but it saves a pretty lot of triangles. And that is absolutely recommended on LOD0.
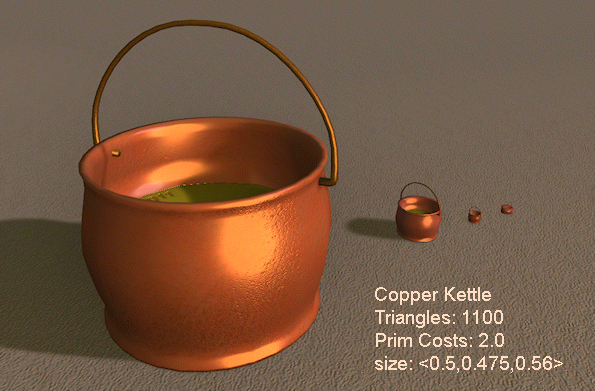
After importing this mesh and the textures to our online world, the final result looks like this:
Any open questions ? Then please feel free to ask. I will be happy to get any response and suggestions for enhancements or pointers to parts which need more explanation.
Cheers,
Gaia
