Part I Getting your Avatar from your online world
You can do that with the Phoenix Viewer or with Emergence (special thanks for this hint go to Brian Kanisz). Other viewers might work or not. You have to experiment a bit. However here is how you can do it with Phoenix:
- Prepare your avatar: Take off the shoe base. Otherwise your avatar is created with an ugly looking heel. As far as i have seen the currently effective morphs are taken into account. So watch your fingers during export. They might be morphed into the relaxed pose, pointing pose, or fist pose. If you don’t want that, you need to remove your AO (animation overrider) first.
- Open the Advanced Menu. If you do not see the Menu button in your top menu, then you can unhide it with CTRL-ALT-D.
- Navigate to “Advanced -> Character -> Meshes And Morphs”
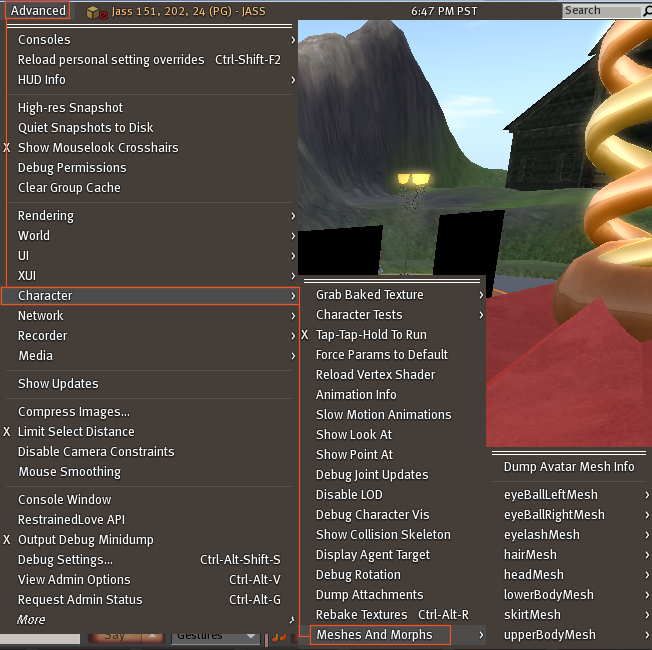
- Move down further along the path:
“headMesh -> headMesh -> CurrentMesh – Save OBJ”
and save the file to your favorite location on your computer.
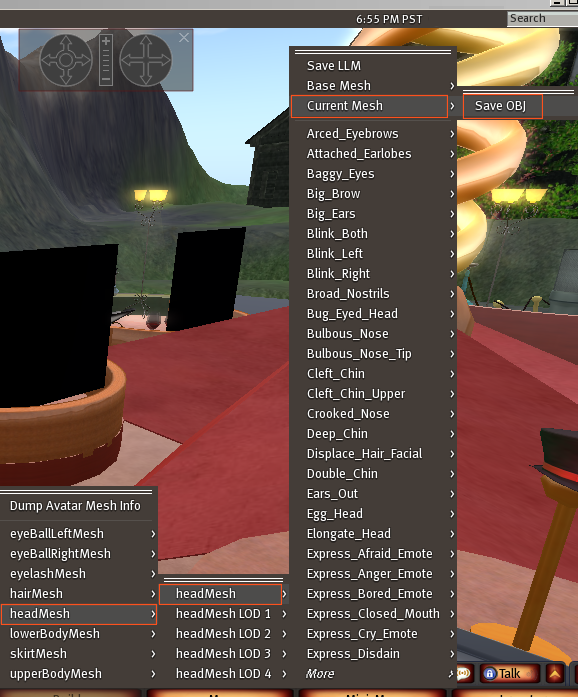
- Proceed with the lowerBoddyMesh and the upperBodyMesh in the same way.
You will end up with 3 .obj files named:
- avatar_head.llm_current.obj
- avatar_lower_body.llm_current.obj
- avatar_upper_body.llm_current.obj
If you wish you also can download all other parts of your avatar (skirt, hair and eyes) but for our purpose this is not necessary.
Part II prepare the rig in blender
- Make a copy of avatar.blend and open the copy with blender. This file contains all we need to get our personal avatar perfectly rigged in a few minutes only.
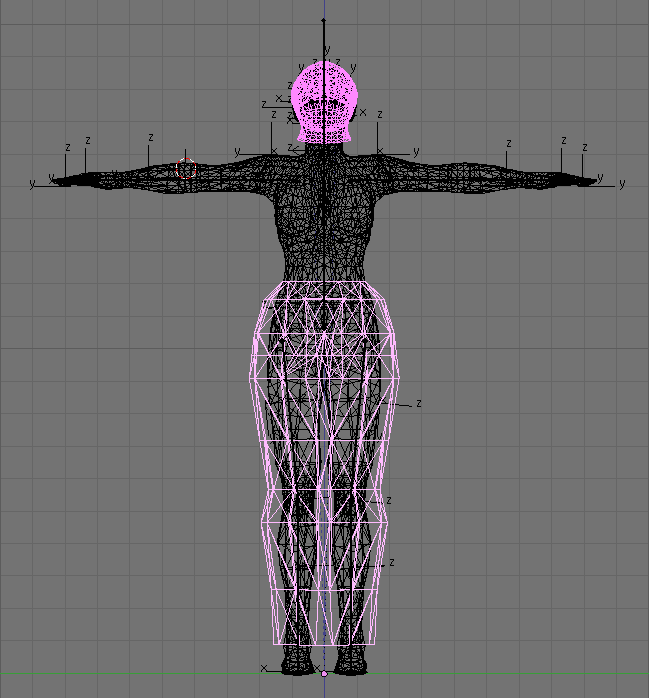
- Hide all unneeded parts of the default avatar, i.e. the skirt and the hair:
- Just right click the hair part,
- then SHIFT right click the skirt part,
- then press the “h” key to hide the parts:
We do this only for convenience. It is not necessary!
- Now select the Head,
- then SHIFT right click the UpperBody
- and SHIFT right click the LowerBody of the avatar:
- We will move the selected elements to another layer (layer 2) by pressing
 the “m” key and selecting layer 2 Press OK. This is also not necessary, but it leaves us with a cleaner desk at the end.
 - Now select just the Armature and move it to layer 2 just as you did before (press “m” and select the layer, then press OK)
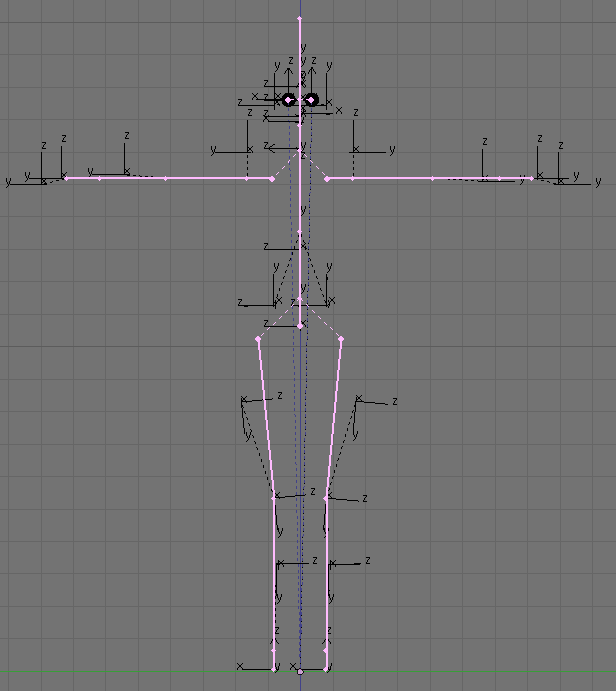
Note that you could have selected the body parts AND the armature in one step and move all of them together. But maybe you want the Armature to be placed on yet another layer, or as in my case i just have forgotten to select it right away (shhh… Mum’s the word! 😉 ).
By now we have separated the 3 body parts and the armature into layer 2. We will now add the exported avatar from the first step.
III Import the Avatar
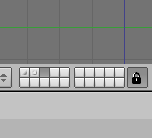 While still in object mode select an empty layer (by clicking on one of the small rectangular icons in the 3D view menu bar). You can just use layer 3 if you like.
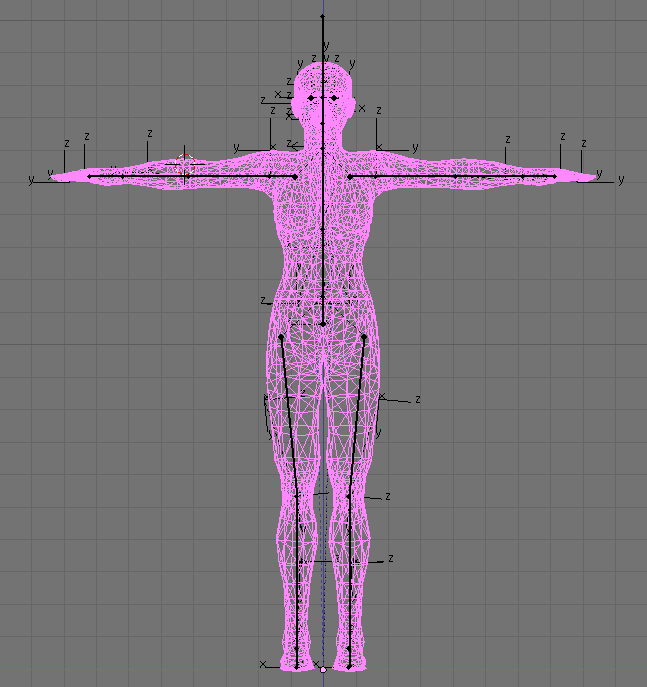
And since you selected an empty layer, you won’t see anything in the new layer. This is on purpose! Your SL-default avatar is still sitting on layer 2.- Now add your personal head via:File -> Import -> Wavefront object and in the import options deselect the button “-90”:
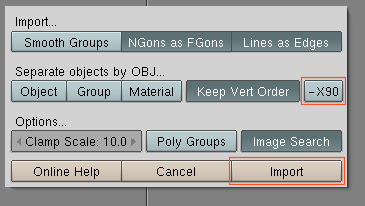
- And then click on “import”.
- Proceed with your personal upperBody and LowerBoddy one by one in the same way (File -> Import -> Wavefront Object …)
Now the default avatar and your personal avatar are perfectly aligned to each other, but reside on different layers. You may need to adjust the size of your avatar. Take care that it is scaled such that its height matches the height of the default avatar.
There may be a possible problem with tinies. I have not checked how they work with the Phoenix exporter. So if anybody stumbles over an issue with tinies i would appreciate if you reported a comment here. Thanks!
Depending on what you want to do with your personal avatar later you can now join the 3 body parts to form one single mesh. This is not strictly necessary though, but it may make your life easier later. So let us join the parts now. But we will be clever and first add some seams so we can actually see where we have glued the parts together. This also comes in handy later:
- Select the upper body part of your personal avatar and go to edit mode
- Now select only the topmost loop where the head will later be glued to the upper body and select the lowest loop where the lower body will be glued to the upper body. Hint: When you press “z” you will toggle between solid mode and wireframe mode. You may prefer the one or the other mode. Here i switched to solid mode for demonstration:
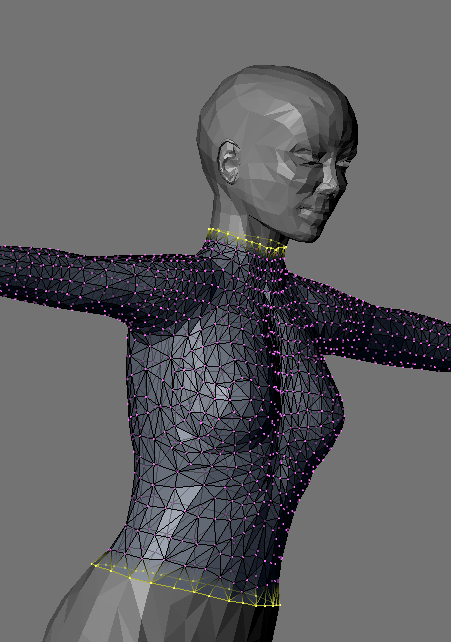
- Finally press CTRL – e – 1 (mark as seam). Now the yellow lines should turn orange.
- go back to object mode
- Now subsequently select the head, mark the corresponding seam to the upper body.
- Then proceed with the lower body and again mark the seam to the upper body.
Note: I want to keep the exact seams for later. This comes in handy for various purposes. But i also want to glue the 3 body parts all together and remove duplicate vertices. But when removing the duplicates that may unintentionally remove parts of my seams too. The reason is that the remove double does not define which of the duplicates is actually removed.
I can avoid to loose the seams by just defining them for each of the 3 parts separately. Then when i join the parts and remove doubles, the seams keep intact (because all duplicates are actually marked as seam and so t does not matter which of them get removed).
So let us go ahead now:
- Go to Object mode
- Select all 3 parts of your personal avatar (right click the first, then SHIFT right click the other 2)
- Object -> Join Objects -> Join selected (Yes, you want to merge the selected meshes).
- You can go to edit mode and verify that now all 3 parts are indeed part of one object and the seems are fully preserved:
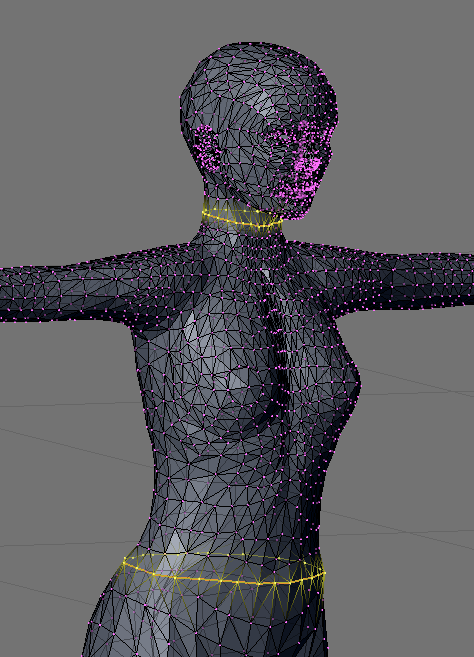
- Now let us remove the duplicates:
go to edit mode and remove doubles (w 6) and wonder how many vertices get removed. There are a few more of them duplicated in the mesh besides the ones at the seams. - go to object mode and “set smooth” (in the F9 button section). This will make your avatar look less blocky and more like you will see it in your online world:
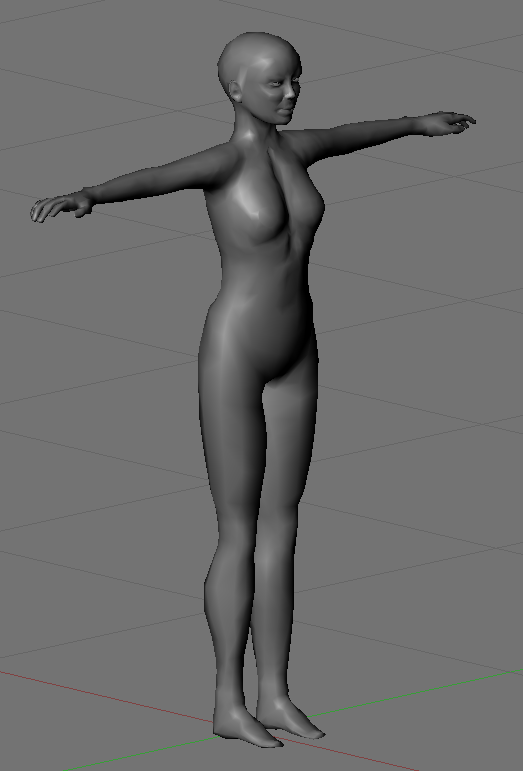
IV Copy the mesh weights
So we have now a default avatar separated into 3 parts and we have our personal avatar as one single object. Now how to proceed ? We need to rig that avatar and create the weights for the rig. But we have one big advantage: Both meshes are fully compatible, hence the weight maps from the default avatar will fit exactly to the mesh of your personal avatar (because your avatar has been morphed from the base mesh). So we can actually just copy the weights. And fortunately blender supports that.
One note beforehand: You may want to scale your avatar up or down as needed. the better it fits to the mesh of the default SL avatar the more acurate will be the weight copy! But i also found that even rough correlations will be enough to gain reasonable results with this method in a very short time.
Note: As mentioned before i do not know how tiny avatars behave in this context!
- select the new avatar
- go to edit mode and switch to face select mode. I do this, because in face select mode the seams will help me to select the right sets of vertices.
- ensure that no face is selected.
- put your mouse over any of the head faces and press “l” (lower case of “L”). this will select the face under the mouse plus all linked faces. But tada, it will stop the selection at the seams! So this is a nice trick to just select the head part without need to single select faces or vertices:
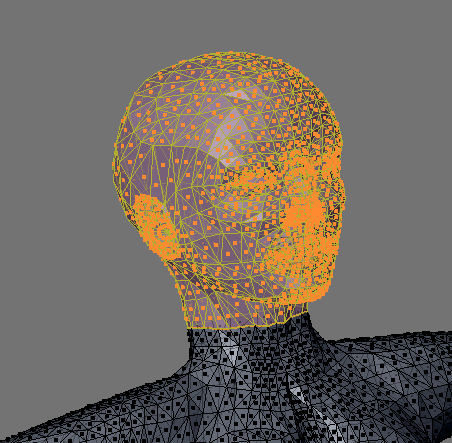
- Now we will copy the weights of the default avatar head to this selection of faces into the personal avatar:
- go to object mode
- switch over to the layer 2 and SHIFT select the default SL-avatar head.
Note: It is important that the SL-avatar head is selected AFTER your personal avatar! - Double check that both objects (your avatar and the default head) are selected(just switch between the 2 layer and see both objects are selected)
- Selected both layers at the same time (SHIFT select the layers) so you can see both avatars together (see the image below).
WARNING: It is evident that you have both layers selected at the same time. Otherwise you will get an error message stating that you should select 2 objects - while still in object mode: Object Scripts -> Bone Weight Copy:
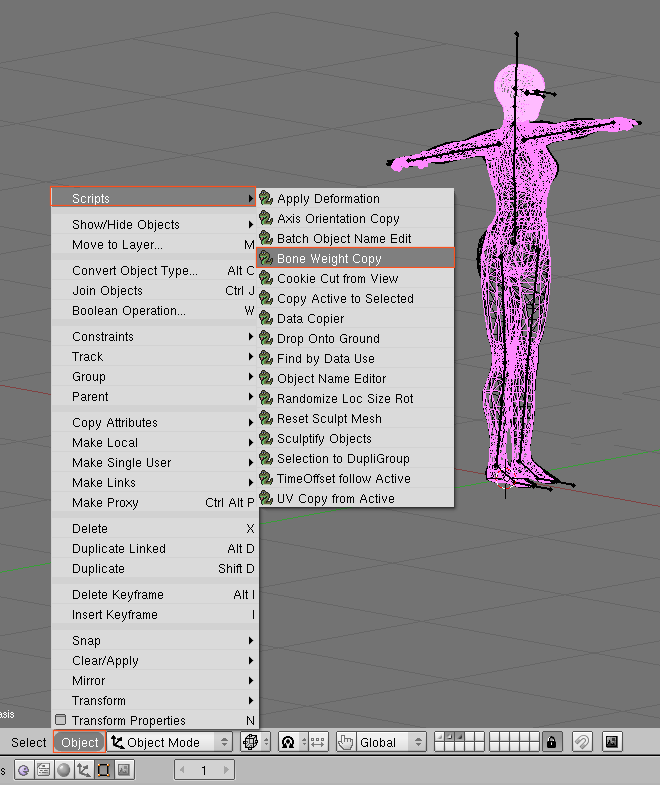
Note again that i have selected Layer 2 and 3 together. You see that the head is rendered in lighter pink. this indicates that the SL-default avatar has been selected as secnd object which is what we want. - In the upcoming Copy Weight popup box select “Quality: 3” and then press OK. Quality has an impact on the precision with which the mesh weights get copied. With Quality set to 3 i get good results:
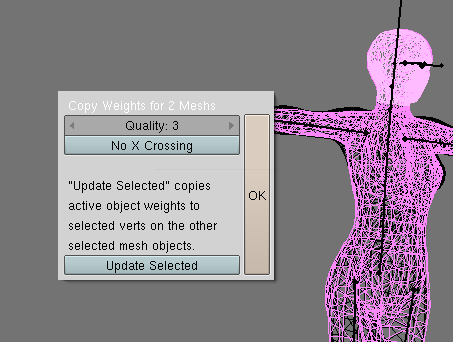
- First nothing seems to hapen. But after a few secs you can see that a progress bar pops up in the top menu bar indicating the rendering time for the weight copy:
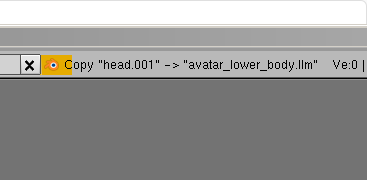
Depending on your computer power the calculation can take up to several minutes until the weights are finally copied. And sometimes the progress bar does not show up but the calculation still takes place.
After the initial weight copy has taken place, you may want to take a look at the settings of your personal avatar. In fact the weight copy program has added a whole bunch of vertex groups (logical groups of vertices) to your avatar. Here is how to examine them:
- go to layer 3
- Select your personal avatar and lookup the vertex groups. (I think you will always see “Worried Eyebrows” as first selection. So this may give you a hit where to find the vertex groups in the edit button section (F9). From all of these groups only the 2 groups “mHead” and “mNeck” are relevant. The other groups have to do with the morph targets defined for the default SL_avatar. Since Morphs are not supported with meshes, we will ignore these vertext groups and just keep them. they are not harmfull.
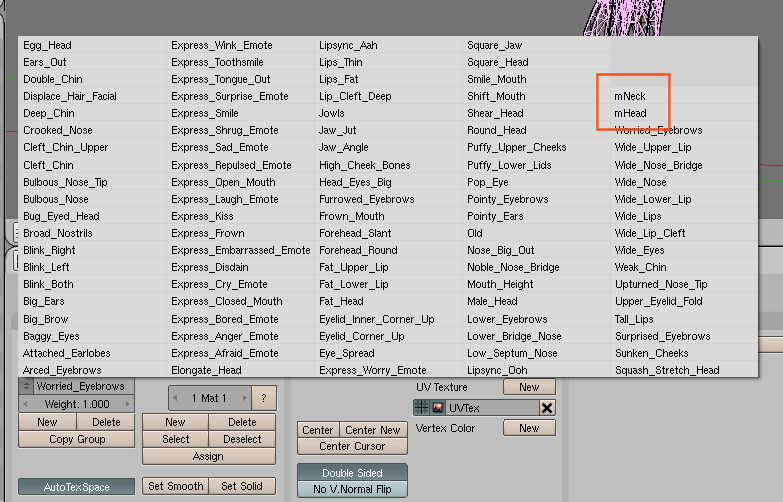
Now lets get back and proceed with the upper body part as follows:
- go to layer 3
- Select your personal avatar
- Go to edit mode and there select only the upper body vertices. You can do this exactly as you did before with the head:
Just deselect all faces, then place the mouse at any face in the upper body part, then press “l” (lower case of “L” and see how only the upper part gets selected. So seams are great for modelling too 😉 - go back to object mode
- go back to layer 2 and there select the UpperBody part of the SL-default avatar:
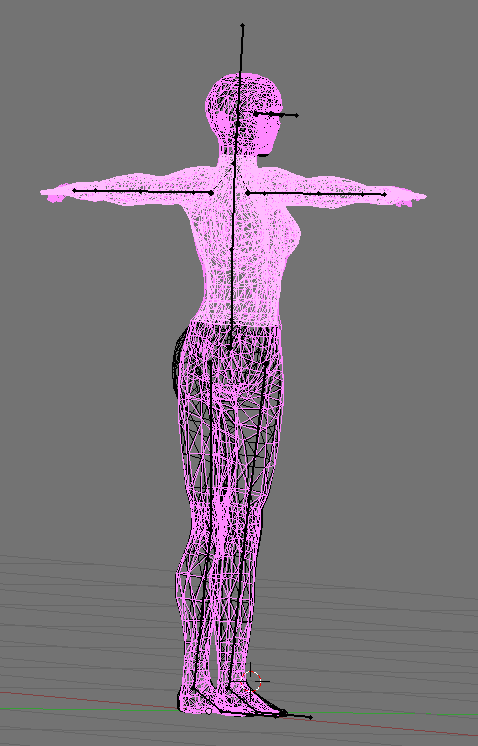
- Again select: Object -> Scripts -> Bone Weight Copy
- ATTENTION NOW!!!
In the upcoming popup menu select:- Quality 3 as before
- and now also checkmark “Update selected” !
If you do not do that, you will get an error about two objects with vertex keys not beeing processable by the copy process. So please ensure that “UPDATE SELECTED” is enabled!
- Press OK. And when the copy is done then go back to the personal avatar,
- go to edit mode
- and select only the lower body part vertices. You know by now how to do that.
- go back to object mode
- go to layer 2
- SHIFT select the body part of the avatar
- Again: Object -> Scripts -> Bone Weight Copy
- And AGAIN ATTENTION!
In the upcoming popup menu select:- Quality 3 as before
- “Update selected”
By now our weight painting is done. We only need the rig. Note that by now you will see 19 vertex groups in your personal avatar which all start with the letter “m”. These vertex groups will be directly associated with the correct bones in our rig. The remianing groups are of no relevance for our purpose.
Creating the rig
We can reuse the already existing rig from the default avatar. And to make our life easy we first make the rig visible in layer 3 as follows:
- go to layer 2
- in object mode right click the rig:
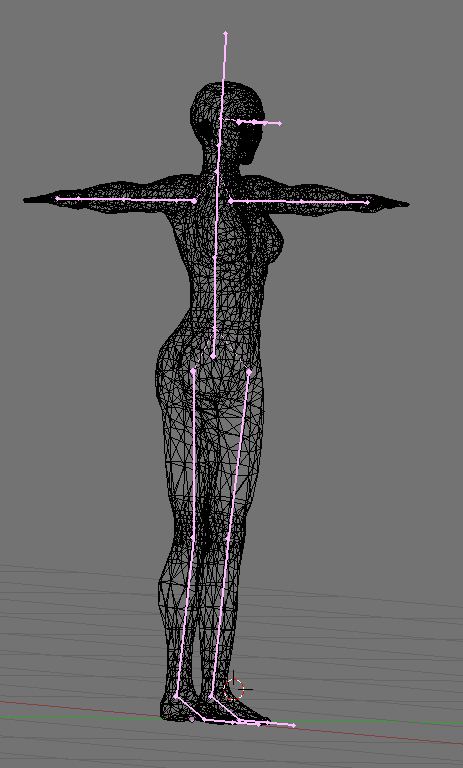
- Press “m” and SHIFT select layer 3. This will make the rig appear in layer 2 and in layer 3:

- Now go to layer 3. You will see the armature and your personal avatar. And if everything went right your avatar is already placed at the corre t location. Now right click the personal avatar.
- Then SHIFT right click the rig:
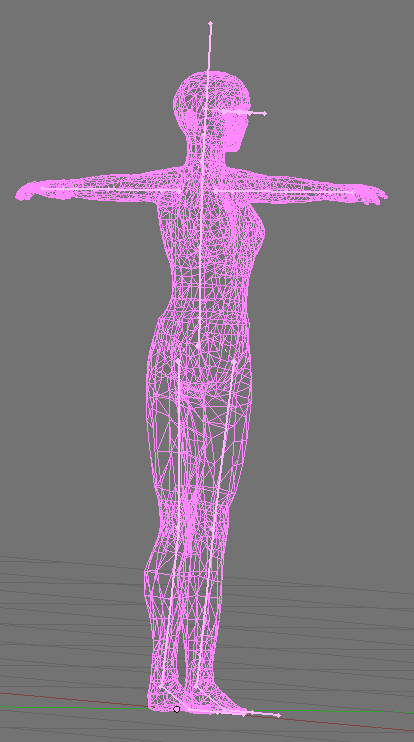
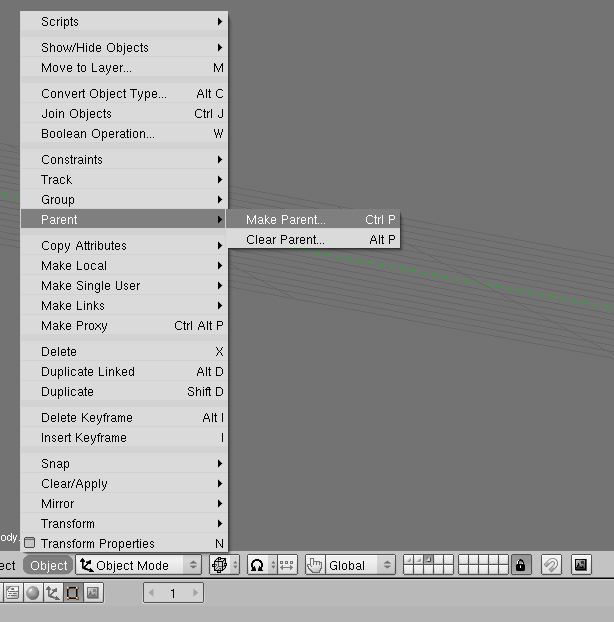
- Navigate to Object -> Parent -> Make Parent:
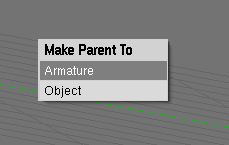
- Select : “Make Parent to Armature”:
- Don’t create groups (They have been created by the copy tool):
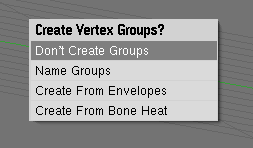
- That’s it! Done! (well not fully done, you will see in a minute why)
Test your rig
So now we can check if our rig works properly and the personal avatar reacts when the rig gets moved:
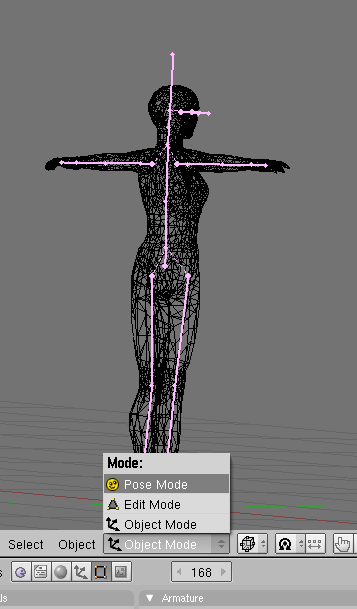
- Go to layer 3 and in Object mode select just the rig: then choose “Pose mode”:
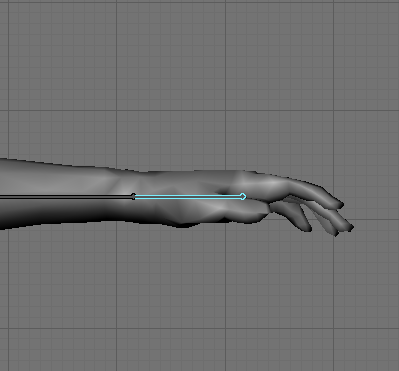
- Now you can select individual bones by right clicking on them. Lets try the left hand. Right click on the bone. Its color changes to a light blue:
- Now press “r” to rotate the bone. You will see that the mesh reacts by bending along with the bone:
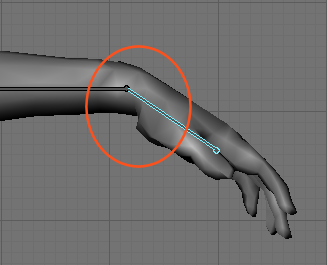
Actually i have seen a few issues with the Weights of the SL default avatar itself. And these problems get copied to our own mesh model. Look for example at the sharp edge at the wrist. This is partialy caused by a bad mesh topology and by a bad weighting in that area. We will fix that issue later. - For now you should go ahead and test all your bones to find errors in the weighting, i.e. parts which do not bend appropriately, or seem to get ripped off when you move the bones …
- I know of one bad error in this example tutorial. When i move the legs it gets apparent:
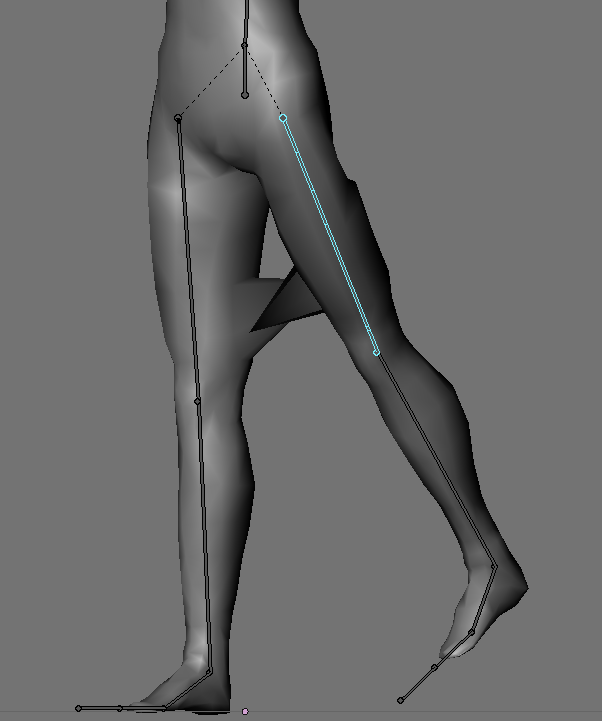
Tis problem is caused by an overlap of vertices in the mesh itself:
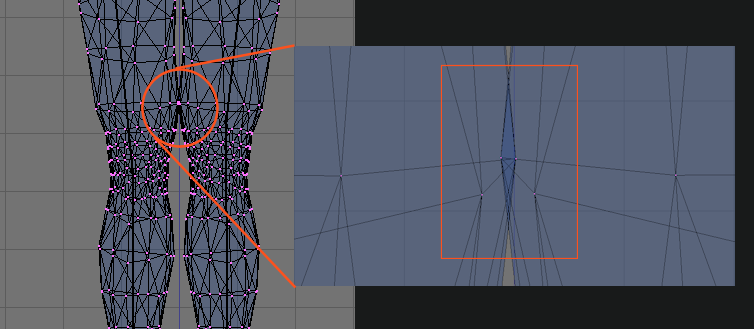
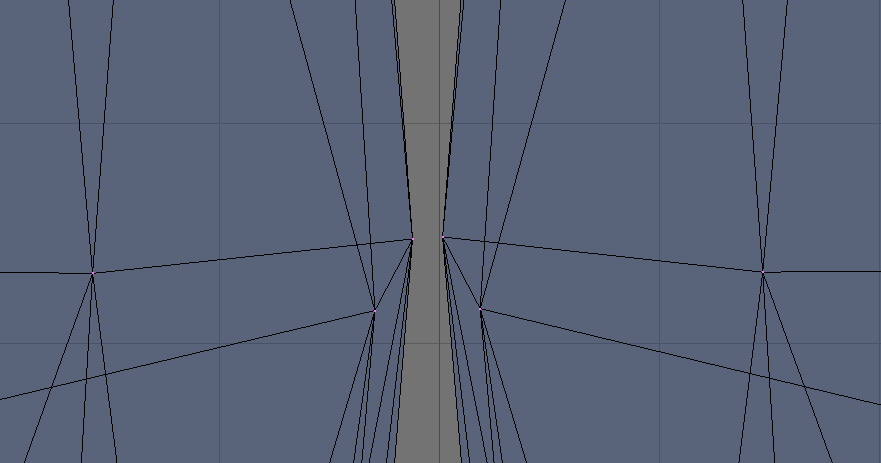
- We can fix this either by correcting the weight map, or by correcting the mesh. If ever it is possible to correct the mesh, that will be the better option. In our case we just have to shift the endpoints of the two overlapping faces a bit to separate the mesh parts: So at the end the thighs no longer touch each other:
- Now select again (only) the whole lower_body part of your personal avatar.
- then go to object mode
- We need to reset the rig now to the rest pose. We do this as follows:
- Select the rig
- If you are not allready in Pose mode, go there now.
- now select ALL bones (press “a” twice) You rig should look like this now:
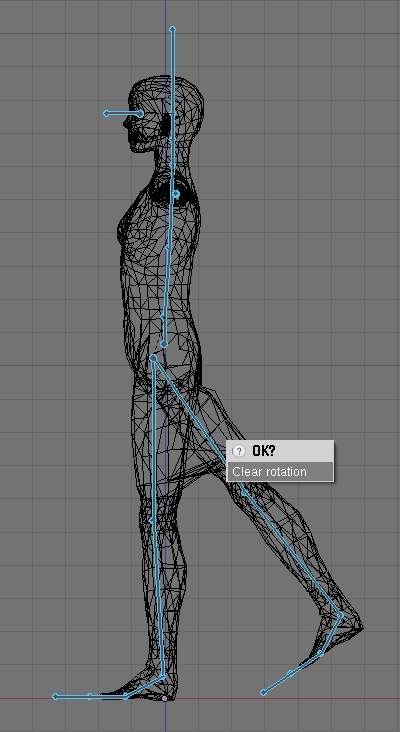
Now you can press ALT -“r” to clear the rotation of all selected bones. The rig should snap back to the rest pose. - Now go to object mode.
- then select the personal Avatar
- and SHIFT right click the lower body of the default SL avatar (on layer 2).
- Now call again Object -> scripts -> Bone Weight Copy (update selected as before)
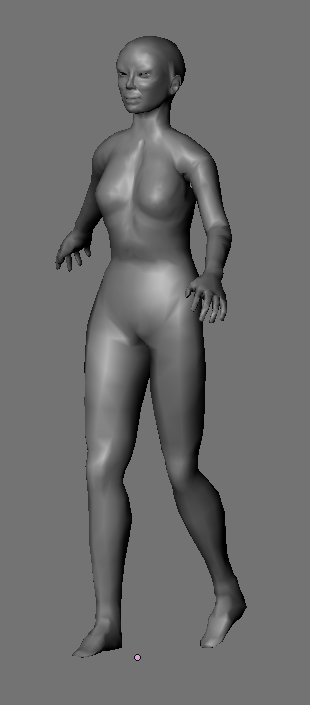
- After you have recalculated the weights for the lower body part, the mesh behaves well:
Summary
Here is the list of what we have done until here:
- Used Phoenix to get our personal Avatar mesh (in three pieces)
- Used Avatar.blend to get the default SL avatar and the SL rig.
- Prepared the SL avatar
- Prepared the personal Avatar (merged parts)
- Copied the weights from the default SL avatar to the personal Avatar
- Parented the personal avatar to the rig
- tested the rig
- Fixed a flaw (overlapping vertices got wrong weights)
- Recopied the Weights
A few more hints:
- If you want to export this avatar, you first have to make the armature “real”. You go to the modifier stack, locate the armature and find the “make real” button. Click on the button and your armature is ready for export. If you do NOT do this, your collada file will not contain the weight data!
- If you want to get this avatar into the Mesh beta, just select the avatar and save it to a collada file. The weight data will automatically be added.
- If you want to texturize the avatar, note that the UV maps for head, upper body and lower body are still intact and are the same as with the default SL avatar. You only need to assign three images to the different parts of the mesh:
– Select the head faces and assign these to one image.
– Then select the upper body faces and assign those to a secnd image.
– Finally select the lower Body faces and assign them to a third image. – Now each of the three images will be texturizable just like before. hint: Use the image Pin to work with multiple texture faces on one mesh!)
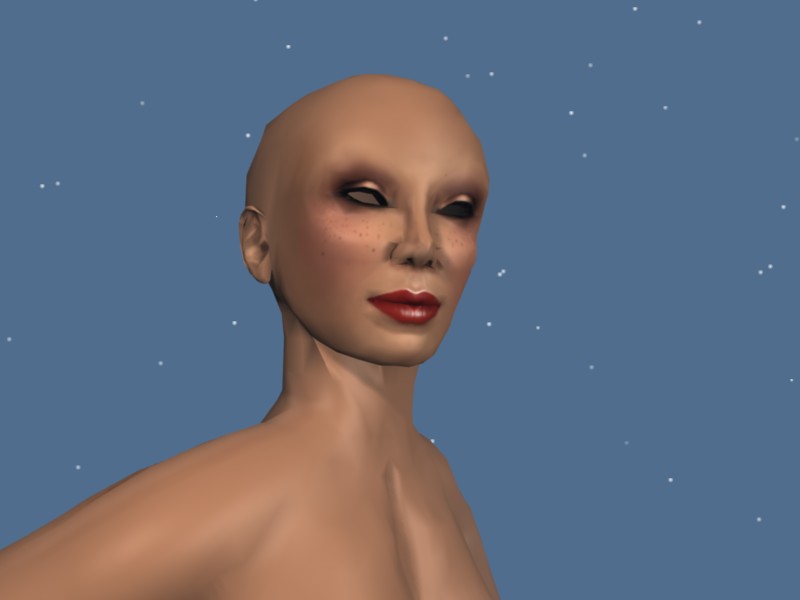
Note further that the UV maps are exactly matching what SL wants to see for the default avatar mesh. So if you have an SL-skin at hand, go for it and add it to your avatar. it will work. I used Vint Falken’s open source skins as a test:
The next tutorial will take care about weight painting.
Thank you for reading.
Donations are welcome
