Overview of the animation rig
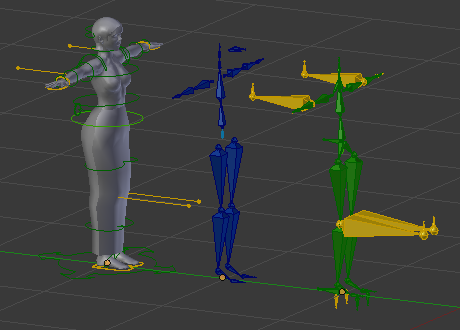
The animation rig for Avastar is sophisticated and flexible. The rig bones have been given custom shapes so they appear as circles and loops outside the characters body. When you select various bones, controls relevant to that bone appear in the properties pane (you can also choose to show all the controls all the time if you prefer). By default the armature is set up to use rotations or grab-and-drag controls on the torso; and rotations, Auto-IK, or IK on the limbs.
The Pelvis has been flipped over from the default SL position and hangs off a centre-of-gravity (COG) bone which makes animating the hips easy. The COG bone itself is used to set the position of the entire character, and works particularly well with the IK controls described below.
Avastar’s rig adapts to the shape of the character, so if you make the character taller the controls will also shift to accommodate the new shape. This makes it easy to create a set of animations to suit different character sizes.
Since people have different preferences, Avastar’s rig has been designed to be customizable without breaking the animation code. In fact, you can remove the entire rig and create your own, and still use Avastar to create animations.
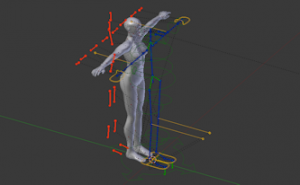
 There are actually three layers of bones that make up the complete rig (picture on right). All bones have the Origin bone as a common root. The first layer are the SL bones and are colored blue. They have the usual SL names like mPelvis, mWristLeft, etc. They are the only bones that deform the mesh and normally you wouldn’t interact with them so they are hidden away on their own bone layer. The exported animation is taken from the SL bones only. The secnd layer is in green and these are the main rig bones that you would interact with. The bones have the same names as the SL bones but without the leading “m”. The SL bones have constraints applied so they follow the motion of the rig bones like a chassis. There are a few more rig bones than SL bones to improve the behavior of the rig and implement the inverted pelvis, these extra bones are also hidden away and can’t be animated. It’s the rig bones that you see as green line controls around the avatar. The final layer is the IK controls – these are in yellow and control the movement of the limbs by inverse kinematics. The IK controls have also been given custom shapes. The visibility of the various groups of bones can be controlled from the panel
Rotation (FK)
With the IK/FK sliders set to FK, all the bones can be rotated to set the pose. This is very similar to programs like Qavimator, but you can use Blenders more sophisticated tools to rotate in the plane of the current view (press r and move mouse), around particular axis (e.g. r-x to rotate around x-axis), using pivot mode (press r twice), or in the bones own space with the rotation controls. You could also select multiple bones or rotate about the 3D cursor for various other effects.
The joints have been given limits that correspond roughly to the limits of human motion (actually they are considerably more generous) so it’s easy to generate realistic poses without tying your character in knots. On the other hand, if you do want to tie your character in knots you can easily switch these rotation limits on and off from the panel.
Grab and drag
Grab any of the torso bones (select and press g) and the bone will follow the mouse. The parent bone will align itself to the bone you are moving. The movement is contrained to be on a sphere about the parent bone so you won’t tear the bone out of the character.
This mode is not so useful for the limbs themselves, so they have been set up to use Auto-IK instead.
Auto-IK
In the Tool shelf of the 3D View tick Auto-IK. Now grab and move any of the limb bones such as a wrist. All the bones up the chain to the torso will move and align themselves with the motion. As well as the rotation limits mentioned above, the stiffness of the joints has been set up so that his motion produces nice results – for example the shoulder will move more easily than the collarbone.
Inverse Kinematics (IK)
When a limb is carrying weight such as a foot when standing, or a hand when climbing, you want that limb to stay in the same place and to move the body around that point. This is were IK controls come into their own. Each limb has full IK controls (the yellow controls) and these can be switched on and off using the IK/FK sliders in the properties pane.
Switching the IK/FK slider for a limb to IK will make the limb try and match the control as best it can without exceeding the rotation limits. You can now move the body of the character and the arm or leg will adjust so that the hand or foot stays aligned with the control. You can control the orientation of the limb with the yellow elbow and knee targets.
The foot IK controls have two parts – the main control in double yellow lines, and a pivot shown as a bar across the foot control. Use the main control to set the placement of a foot and the pivot to set the rotation. The position of this pivot can be adjusted by a slider in the panel to be anywhere from the ball of the foot to the heel. This control not only makes it easy to create a foot roll for a walk cycle, but also makes it easy to animate active movements on the balls of the feet. The limits of the pivot control take into account the avatars shape including the foot and shoe shape.
Hinges
There are hinge switches or sliders for some of the bones such as the head and shoulders. These will show up in the control panel when the bone is selected. The purpose of the hinges is to control whether the rotation of the parent bone gets transmitted to the child bone.
