The Blender Weighting Tools (2.68) |
|
|
Blender provides a collection of weight tools. And Avastar adds even some more. Most tools are available from Weight Paint mode. And some of Avastar’s buttons are just convenience additions so that you can “find all at one place”. However we have used this redundancy only very sparingly to avoid confusion. This chapter gives a brief overview of the available tools. |
The weight Tools are mainly available from 4 locations in the Blender UI:
Many options are also available from various locations in the popup menus. And we also have keyboard shortcuts for some of the more commonly used tools. |
Tool Shelf panels (weight Paint Mode) |
|
|
Most tools for weight Painting are found in the tool Shelf when you are in weight Paint mode. The functions and options are found in several Tool Shelf Panels: |
|
Brush |
|
|
Blender provides a couple of paint brush presets for various purposes:
You can use all preset brushes for your work and you even can add your own brushes with your preferred settings (You can store your own frequently used brushes within your custom startup.blend file) The most important parameters for brushes are Weight, Radius (size) and Strength. You find even more parameters in the Stroke panel and in the Curve panel (see Tool Shelf, below the brush panel) |
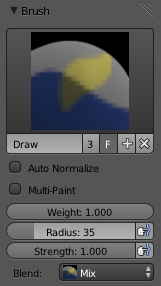 Hint: Each of the defined Preset Brushes uses a different “Blend” Mode (See bottom most parameter on the image above) . You should be aware that Brush presets are editable, hence changing the .blend mode will affect the brush behaviour! Hint: Each of the defined Preset Brushes uses a different “Blend” Mode (See bottom most parameter on the image above) . You should be aware that Brush presets are editable, hence changing the .blend mode will affect the brush behaviour! |
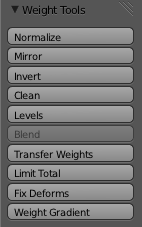
Weight Tools |
|
|
Blender provides a set of weight helper tools for various purposes. The tools are all collected in the weight tools panel. Some of the tools can work an a set of weight groups:
These tools also provide a Subset parameter (in the Operator panel, displayed after the tool is called, available with Blender 2.68) with following options:
|
The weight tools are reworked and will be improved for Blender 2.68 Hint: The Blend tool only works when “Vertex selection masking for painting” is enabled. Otherwise the tool button is greyed out. |
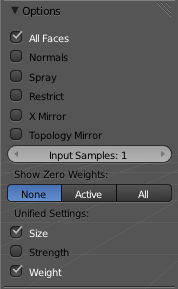
Weight Tool Options |
|
|
The Options modify the overall brush behaviour. The most commonly used options are:
|
 |
Normalize |
|
| If only one Bone is selected: The tool maps the highest weight value used in the bone weight group to 1.0 and scales all other weight values accordingly. this ensures that the maximum possible range of weight values is used.
If a subset is selected: For each vertex of the mesh the sum of all used weights for that vertex will be 1.0 |
Parameters:
Subset: defines which groups are affected. Lock Active: Keep all weights of the active group untouched and recalculate the weights of all other selected groups. |
Mirror |
|
| This tool mirrors the weights from one side of the mesh to the opposite side(only mirror along x-axis is supported). But note, the weights are not transferred to the corresponding opposite bone weight group.
Note: If you want to create a mirrored weight group, then you will first create a copy of the current bone group, then rename the weight group to the name of the bone on the opposite side, and finally perform the Mirror tool. (See below for an alternative provided by Avastar. |
Parameters:
Mirror Weights: Flip Group names: All Groups: |
Invert |
|
|
Replaces each Weight of the selected weight group by 1.0 – weight. Examples:
Note: Please see how the parameter setting changes the behaviour. |
Parameters:
Subset: defines which groups are affected. Add verts: Adds Zero verts for unreferenced verts before conversion takes place. Remove verts: Remove Zero weighted Verts from weight Group after Conversion has been done. |
Clean |
|
| Removes weights below a given threshold. This tool is useful for cleaning your weight groups from very low (or zero-) weights. | Parameters:
Subset: defines which groups are affected. Limit: defines the minimum value that a weight must have in order to be kept in the weight group. Keep Single: Guarantee that for each weighted vertex at least one weight will be kept regardless of the weight value. |
Levels |
|
|
Adds an offset and a scale to all weights of the selected Weight Groups. with this tool you can raise or lower the overall “heat” of the weight group. Note: No weight will ever be set to values above 1.0 or below 0.0 regardless of the settings. |
Parameters:
Subset: defines which groups are affected. Offset: A value between -1 and +1 will be added to each weight. However the tool guarantees that all weights remain in the allowed range (Values are clamped to [0.1]) Gain: A value in the range [0, 10] used as multiplier for each weight. However the tool guarantees that all weights remain in the allowed range (Values are clamped to [0.1]) |
Blend |
|
| Blends the weights of selected vertices with unselected vertices.
Hint: this tool only works in vertex select mode. |
Parameters:
Factor: A value in the range [0,1] which defines the width of the blend area
|
Transfer weights |
|
| Copy weight groups from other meshes. The function has several methods for transfering the weights. Note that this function needs other mesh objects to be selected along with the active object. Otherwise no weight transfer will happen. | Parameters:
Subset: defines which groups are affected. Method:
Replace:
|
Limit |
|
| Reduce the number of weight groups per vertex to the specified Limit. The tool removes lowest weights first until the limit is reached.
Hint: The tool can only work reasonably when more than one weight group is selected. |
Parameters:
Subset: defines which groups are affected. Limit: Maximum number of allowed weight groups per vertex. Typical value for game engine: 4 (also used as default in Blender)
|
Fix Deforms |
|
| Unclear what that function is supposed to do. | Parameters:
Distance: defines which groups are affected. [-10, 10] Strenght: [-2, 2] Change Sensitivity: [0.05, 1]
|
Weight Gradient |
|
| Creates a weight gradient field and maps it to the selected weight group (active bone). | Parameters:
Type: defines which groups are affected. X start: X-End: Y Start: Y-End:
|
Properties sidebar(Mesh edit mode): |
|
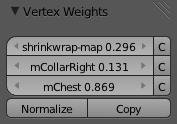
Vertex Weights |
|
|
The Vertex Groups Panel in the properties sidebar (only in Edit mode) exposes the weight values for weight groups associated to the active vertex. These values can be modified. If multiple verts are selected, then you also can copy the weights of the active vertex to the selection (C Buttons at the right side).
|
 |
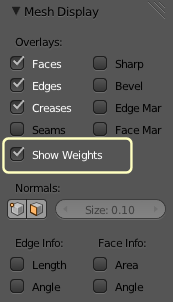
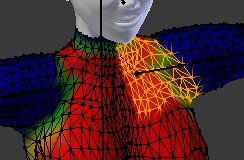
Mesh display |
|
|
You can enable the display of weights in Edit mode. Then you can select the desired weight group from the vertex Group List in the Object Data properties. The weights from that group will be displayed on the surface of you edited mesh:
Note: When you change the weight values of a vertex, and when the related Weight map is selected for display, then you can see the changes of the weightmap instantly. |
 |
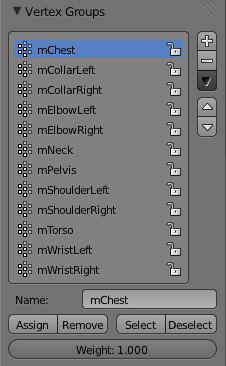
Object data Properties: |
|
|
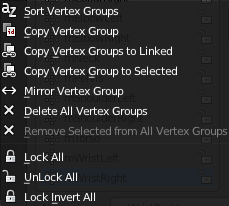
You find the Vertex groups list in the Object Data properties. Each deform bone can have one associated Vertex Group (with the same name as the bone). This vertex group contains the Weights associated to the bone. Note: When you rename the vertex group, then you break the association to the bone. In the example on the right you see 12 Deform groups are defined for 12 bones. You can select the active Deform group by clicking into the list. You can lock each group to protect it from getting changed by any Weight group tool. You also can add (+) more Vertex groups for various other purposes, or remove existing groups (-). At the bottom of the panel you find some more functions:
When you click on the dark grey arrow down button (Below the +/- signs) then a Menu pops up containing all sorts of Weighting tools. |
Hint: You can enlarge/shrink the list box size by holding down the SHIFT key and rolling the middle mouse roll button. You may need to move the mouse a bit as well while you roll the.
|
Modifiers |
|
|
We also find some weight tools in the Modifier Stack. These Modifiers allow to modify the weight maps in a non destructive way. |
|
Menu (Weights)(weight Paint Mode) |
|
Blender provides 2 Tools for automatic assignement of Deform Weights. The functions are available ni weight Paint mode, from the Weights menu in the Footer:
|