This is a short overview about how we have setup our new Machinimatrix server. This is actually just a log of what was done in detail. But i have tried to keep things general, so others might find this information useful as well.
During my research about how to get a secure webserver for our wordpress Blog i found one document in particular that helped me a lot and i just copied and edited parts of that document to match my special case:
Hosting WordPress Yourself Part 1 – Setting Up a Secure Virtual Server
However i found that some things have been different in our case:
- Server: Debian-10 (buster)
- Client-PC: Windows
This is enough difference to get things done in a bit different way. However some parts of the original document have been copied and only slightly modified because they have already been written in a perfect way.
The goal
We want to setup a WordPress server for hosting all our wordpress installations and our product download service. We want to use in particular:
- Maria DB (as an Open Source replacement for MySQL)
- Nginx Webserver (as a replacement fro Apache2)
- Woocommerce (WordPress Plugin for a web shop)
- Awesome Support (WordPress Plugin for a Ticket System)
- Divi Theme (from Elegantthemes)
- git (revision system to keep track of changes
Setup Login
The very first thing to do is to login to the server. I have a Windows PC so i use putty for opening a shell window on our server. If you use a Mac or another linux system as your client, then things will be very different.
Setup a new putty session on your pc
Open putty, then create a new putty Session where you specify the dns (hostname) and the port 22 (for secure access).
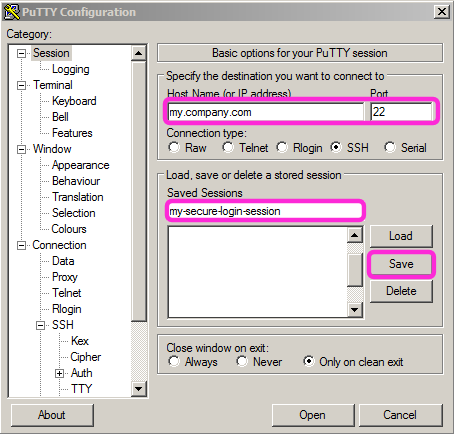
Now i assume you have only a user/password login to your server. The just created entry in putty already allows you to login to your server. And we will now do just that and do some initial preparations on the server. Then we will return back to putty and finish the setup of the configuration.
First login to the server with user/password
Use the just created putty session to login to your server. I assume you have the root password at hand.
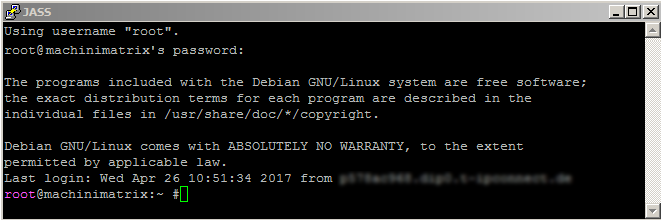
Once you are logged in we will begin some initial cleaning up.
Set a hostname
This is not really necessary but very coinvenient. See the image above. There you see the user (root) and the hostname (machinimatrix) which tells you who you are and where you are. This comes in handy when you have many windows open at once and lost control of where is what. here is how to set the hostname:
hostnamectl set-hostname machinimatrix
Of course you can name your server as you like.
Installing Software Updates
Although you have only just provisioned your new server, it is likely that some software packages are out of date. Let’s ensure you are using the latest software by pulling in updated package lists:
apt update
Once completed, let’s update all of the currently installed packages. You will be prompted with how much space the updates will take – hitting Y and Enter will begin the process:
apt upgrade
When the upgrades have completed you will be shown which packages have installed, and also which packages are no longer required by the system.
Feel free to remove the outdated packages by issuing the following command:
apt autoremove
Creating a New User
It’s time to add a new user to your server. There are two reasons for this:
- Later in this tutorial you are going to disable root login, which means you need another user account in order to access your server.
- The root user contains very broad privileges which will allow you to execute potentially destructive commands. Therefore it’s advised to create a new user account with more limited permissions for day-to-day use. This new user will be added to the sudo group so that you can execute commands which require heightened permissions, but only when required.
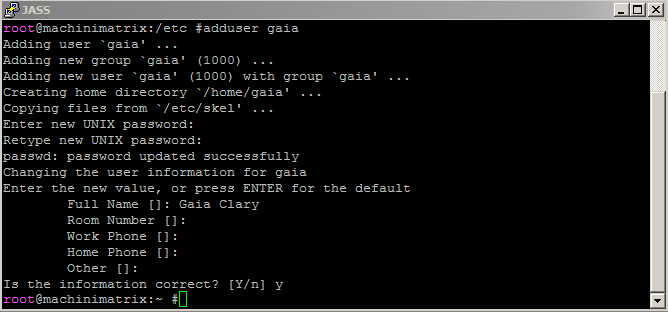
First, create the new user:
adduser gaia
You’ll be prompted to enter some basic user information and to select a password. As mentioned previously, this password should be complex:
Install and configure sudo
Sometimes it is necessary that a command is processed in the context of the root user. However it is not recommended to use the root user for anything else but system maintenance. sudo is used to let you perform root user tasks without being logged in as root user. So this is a bit more secure to use. However when you use sudo you still get a lot of power to damage your system. So take care here.
On my system sudo is already installed by default, however here is how you would install it:
apt install sudo
Next you need to add the new user to the sudo group:
usermod -a -G sudo gaia
Now ensure your new account is working by logging out of your current SSH session and initiating a new one:
logout
Then login with the new account using the same putty session as before but now specify the new created user. We will keep using the new user together with the sudo command for any further activities
Now you are ready to go to the webserver installation. But before you do this you should secure your login by using a client key pair to enable encryption for logging into your server from your home PC. Since i am using a windows PC at home, i have described how to setup a client key pair for putty:
Create the key pair on the server side
At this point your new user is ready to use, however for enhanced security you are going to add public key authentication. I’m not going to go into detail on how to create an SSH key pair (Digital Ocean have an informative article on the process), but if you don’t already have one, enter the following command on your local machine:
ssh-keygen
You should receive a message like I have below, just hit return to accept the default location. You’ll then be prompted to enter a passphrase (optional), which will require you to enter a password every time you login with this key pair:
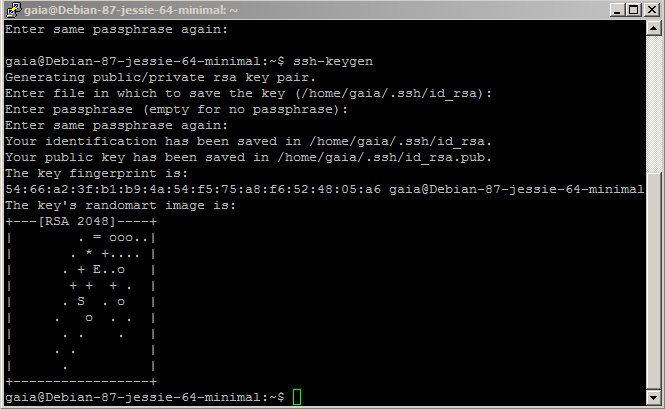
By now we have generated a key pair for a secure login. Now we must move the public key to the correct locations.
Install the public key on the server
We need to move the public key to a file named authorized_keys. This will later be used by the login process to check if the login user has the correct certificate:
cd ~/.ssh
Now you are in the directory where the previous call to ssh-keygen has dropped the key files. Now add the public key to the end of the file authorized_keys.
cat id_rsa.pub >> authorized_keys
This adds the public key to the end of the user’s authorized_keys file. Since we have just added the user, the authorized_keys now contains only the one public key. You can check this by displaying the content of the file:
cat authorized_keys
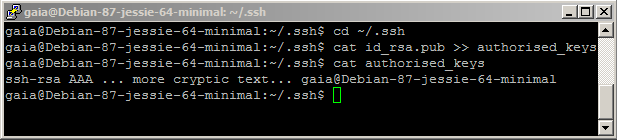
By now the public key is moved to its correct place.
Move the private key to your client computer
You should move the private key to a safe place on your client computer. Luckily the putty shell supports cut and paste so it is rather easy to get the file content to your pc
cd ~/.ssh
cat id_rsa
Now cut/paste the text on the shell to your favorite text editor. I prefer Notepad++ but any simple text editor will do. Finally save the public key file at a safe place on your computer disk. I have named my file as id_rsa_gaia.priv
Please check that the file on your PC and on the server contain exactly the same text. Especially make sure that the file contains plain text! Any text formatting will damage the file.
Install the private key on your PC
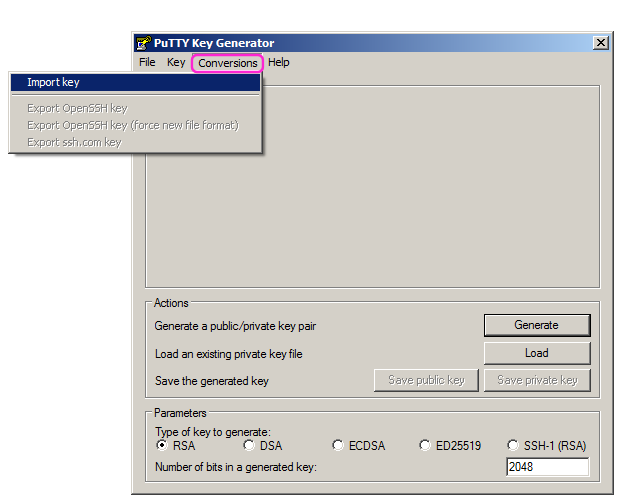
The private key must be converted to putty format. You can do this with the puttygen program and import the private key which is id_rsa_gaia.priv in my case:
- Open puttygen
- Conversions -> Import key
- Navigate to where you have just dropped the id_rsa_gaia.priv file
- If you used a pass phrase when you generated the key on the server side, then you are asked to enter that pass phrase now.
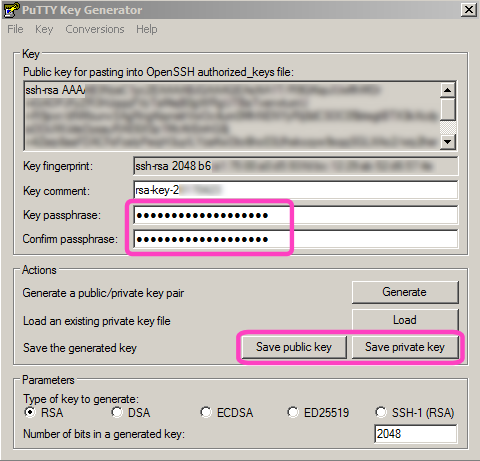
As soon as the private key has been loaded, you can store the private key in a format that can be used by putty. Click the Save private key button and store the private key to a safe place on your disk.
Now open Putty and then load (ensure you use LOAD and not open!) the my_secure_putty_session that you have created previously. Then import the private key into the Connection -> SSH -> Auth node as follows:
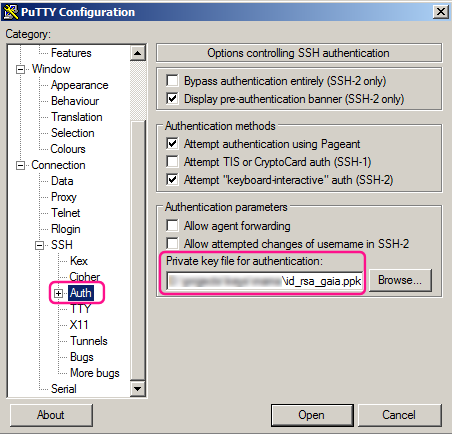
And specify the username on the server as follows:
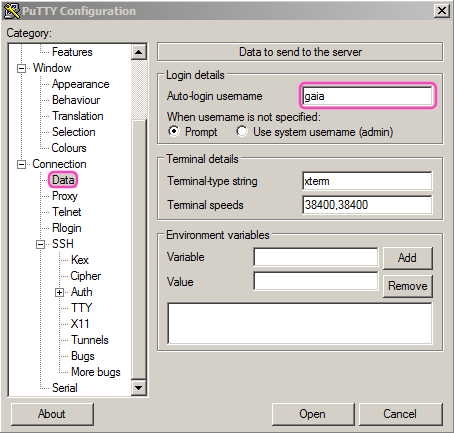
Finally store the session as you did before when you created the putty session (see further up):
When you now open the session, you no longer get asked to enter the user and password. Now your client certificate ios active and if you have setup a pass phrase when you created your certificate, then now you get asked to enter that pass phrase.

Summary
- We have generated a client certificate key pair on our linux server using ssh-keygen
- We have installed the public key into the authorized_keys file on the server
- We have converted the private key to a putty format by using puttygen
- We have configured a putty session for the created user
The benefit for this is improved security against unauthorized login to the server.
You also can restrict a login of the user root from remote and you can deny user/password authentification from remote. This kicks out any attempt to login to the root user. This sounds like a good idea.
SSH Configuration (recommended, optional)
With your new user created, it’s time to further secure the server by configuring SSH. The first thing you are going to do is disable root login, which as the name suggests will no longer let you log into the server via SSH using the default root user. Open the SSH configuration file using nano (notice the use of sudo to heighten privileges for this command):
sudo vi /etc/ssh/sshd_config
Find the line that reads “PermitRootLogin yes” and change it to “PermitRootLogin no”. Save and exit type
:wq
In order for the changes to take affect you must restart the SSH service:
sudo service ssh restart
Now if you exit out of the current SSH session and try connecting with the root user you should receive a permission denied error message.
The final step to securing SSH is to disable user login using a password. This ensures that attackers need your private SSH key to login to the server. Remember, if you lose your private key you will be locked out of the server, so keep it safe! Most virtual server providers do have other means of logging in, but it’s best not to rely on those methods:
sudo vi /etc/ssh/sshd_config
Find the line that reads #PasswordAuthentication yes and change it to PasswordAuthentication no. Hit CTL-X then Y to save the changes. Once again, you must restart the SSH service for the changes to take effect.
sudo service ssh restart
Now, before you log out of your server, you should test your new configuration. To do this open a new putty session for your user, without closing the current SSH session and attempt to connect.
You should login to the server successfully. To further test that password authentication is disabled you can load your putty session, then remove the entries in the data node and in the Auth node, then open the session. When attempting to log into the server this time you should receive a Permission denied (publickey) error or a no authorization method available error.
The firewall for our server can be configured to just let in requests on the usual ports like http, https and ssl (for remote login):
Setup the Firewall
Firewall
The firewall provides an additional layer of security to your server by blocking inbound network traffic. In this article I’m going to demonstrate the iptables firewall, which is the most commonly used across Linux and is installed by default. In order to simplify the process of adding rules to the firewall I like to use a package called ufw, which stands for Uncomplicated Firewall. The ufw package is usually installed by default, but if it isn’t go ahead and install it using the following command:
sudo apt install ufwNow that you have access to ufw you can begin adding to the default rules, which deny all incoming traffic and allow all outgoing traffic. For now, add the ports for SSH (22) and HTTP (80):
sudo ufw allow ssh
sudo ufw allow http
If you plan on running a site using HTTPS you will also need to add port 443:
sudo ufw allow httpsTo review which rules will be added to the firewall, enter the following command:
sudo ufw show added
Before enabling the firewall rules, ensure that the port for SSH is in the list of added rules – otherwise you won’t be able to connect to your server! The default port is 22. If everything looks correct, go ahead and enable the configuration:
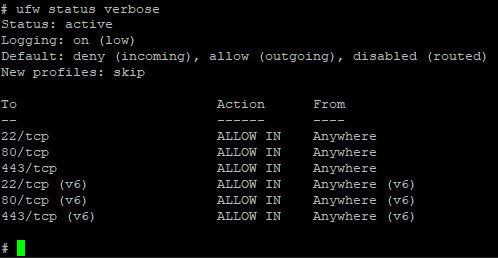
sudo ufw enableTo confirm that the new rules are active, enter the following command:
sudo ufw status verboseYou will see that all inbound traffic is denied by default except on ports 22, 80 and 443 for both IPv4 and IPv6, which is good starting point for most servers.
Your server will be under attack from people who try to login to your system. Some of the most annoying strategies here are to just try millions of possible passwords until one of them hopefully matches. Now we have already kicked out people who try to use user/password (see above). But we also can prevent the server from being occupied with failed attempts to login. Fail2ban simply blocks users for a certain time when it detected a user with multiple failed login requests:
Fail2ban
Fail2ban is a tool which works alongside your firewall. It functions by monitoring intrusion attempts to your server and blocks the offending host for a set period of time. It does this by adding any IP addresses that show malicious activity to your firewall rules.
The Fail2ban program isn’t installed by default, so let’s install it now:
sudo apt install fail2banThe default configuration should suffice, which will ban a host for 10 minutes after 6 unsuccessful login attempts via SSH. To ensure the fail2ban service is running enter the following command:
sudo service fail2ban startJob done! You now have a good platform to begin building your WordPress web server and have taken the necessary steps to prevent unauthorized access. However, it’s important to remember that security is an ongoing process and you should keep in mind the following points:
- Install only required software from trusted sources
- Regularly install software updates and security fixes
- Enforce strong passwords using a tool such as 1Password
- Use common sense and think about how you would gain access to the server if you were locked out