Avastar & Blender 2.7
Avastar is fully working together with Blender 2.70. To be up to date, always use the highest numbered Avastar which at this time is [avastar_addon_zip] (which can be found in the main inventory area and in the test folder of your download page). Please review the changelogs and check this page frequently for newer updates.
Must read before starting
Information on installation: Our Addons & Blender 2.70 General information for fitted mesh, including an overview video: Breaking News on Avastar 1.1 Even if you are only going to do Classic rigging,it is recommended that you watch the video to see where the new panels and buttons are to understand the workflows better.
The Workflows (last updated August 16, 2014)
Update old Avastar Rigs (old Avastar projects)
If you are working with a file containing a previous version’s Avastar figure and rig, please note that the changes are not reflected in the rig when a new Avastar version is released. It is strongly advised to update the rig as Avastar may not work as expected if you do not.
The video above shows how you can easily update your rig using the Avastar Update Tool.
Bind already weighted mesh (classic or fitted)
- Have your mesh and the Avastar figure and rig ready.
- Select both your mesh and the rig (use SHIFT RMB to add an object to your selection).
- In the Avastar Tab:
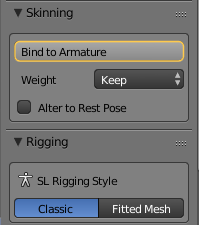
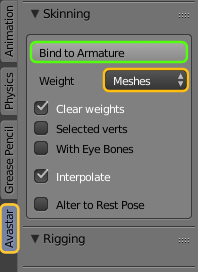
go to the Skinning panel
set the Weight option to Keep
ensure that Alter to Rest Pose is disabled.
Now you are ready to press the Bind to Armature button. At this point both your mesh and rig are still selected and can stay selected for the next steps in the workflow.
Note: If you are doing Classic Rigging, the binding part is now finished.
Optional: Prepare Rig for Fitted mesh
This applies only if you want to prepare your Rig for Fitted Mesh Rigging:
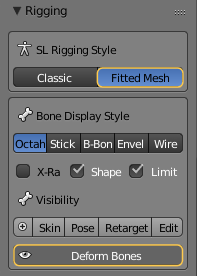
- Open the Rigging Panel and in the Rigging Style section select Fitted Mesh.
- Step back to the Skinning Panel.
- Note: You can switch your Armature to Fitted mesh Rigging at any time, even before you are binding meshes to the Armature!
- Note: The Button Deform Bones has been automatically enabled after you selected the Rigging Style.
Optional: Convert from Classic to Fitted mesh
- Optional: If your Mesh was weighted for Classic Rigging and you want to switch your Mesh to Fitted mesh Rigging.
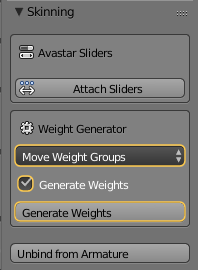
- In the Skinning panel locate the Weight Generator.
- Since we are doing a garment that was previously weighted to Classic Rigging, Select Move Weight Groups. This will move the weights from the SL Base Bone Weight maps to their corresponding Fitted mesh Weight maps for the Collision Volume Bones.
- If you want to get automatic weights for But, Pecs and Back then select the Generate Weights option as well.
- Press the Generate Weights Button.
- The mesh is now ready for you to test with sliders.
- In the Skinning Panel locate the Avastar Sliders Section and click on Attach Sliders.
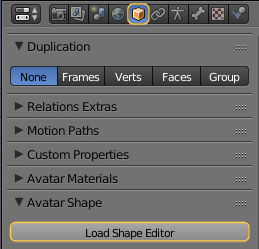
- Go to the Object Properties and press Load Shape Editor (see note below). At this point you can load a Shape File (that you downloaded from SL) if you want to work with a different shape.
- Now you can modify your Character and mesh with the Avastar Sliders.
Note: Loading the Shape editor is only necessary when you open a blend file that contains an Avastar Rig right after you started Blender. In that case the Avastar Buttons are not yet initialized and the Load Shape Editor button shows up.
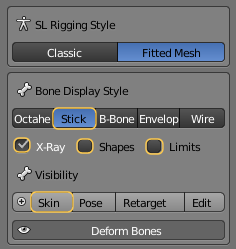
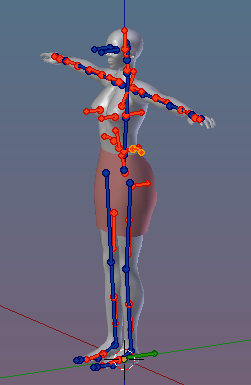
- When you are ready to proceed to weight painting, have your custom mesh selected and go to the visibility section in the Rigging Panel and enable the Skin Preset. This will make the Deform bones visible: in this case the SL Base (blue) and Collision Volume bones (orange), and put your Mesh in the weight room.
option: Extra display settings
- I prefer to also change the Bone Display Style to:
- X-Ray
- disable shapes,
- disable Limits indicator
- enable Stick Display Style
- Use the blue SL Base bones to pose, and the red Collision Volume bones to paint weight onto.
- To update the weights while you’re painting, press alt-q to see changes to the mesh after you paint weight.
Bind unweighted mesh (classic or fitted)
- Have your mesh and the Avastar figure and rig ready.
- Select both your mesh and the rig (use SHIFT RMB to add an object to your selection).
- In the Avastar Tab:
- go to the Skinning panel
- set the Weight option to Meshes
- Ensure that Clear Weights is Enabled
- Ensure that Selected Verts is Disabled
- Ensure that Alter to Rest Pose is disabled.
Now you are ready to press the Bind to Armature button. At this point both your mesh and rig are still selected and can stay selected for the next steps in the workflow.
Note: If you are doing Classic Rigging, the binding part is now finished.
The Pitfall
- Either you must have at least one of the Avastar figure meshes visible (head, upper body, lower body, skirt, eyes) This is normally so by default, so you do not need to worry about this.
- Or you must have at least one other custom mesh with weights already bound to the Avastar figure and visible.
Optional: Prepare Rig for Fitted mesh
This applies only if you want to prepare your Rig for Fitted Mesh Rigging:
- Open the Rigging Panel and in the Rigging Style section select Fitted Mesh.
- Step back to the Skinning Panel.
- Note: You can switch your Armature to Fitted mesh Rigging at any time, even before you are binding meshes to the Armature!
- Note: The Button Deform Bones has been automatically enabled after you selected the Rigging Style.
Optional: Convert from Classic to Fitted mesh
- Optional: If your Mesh was weighted for Classic Rigging and you want to switch your Mesh to Fitted mesh Rigging.
- In the Skinning panel locate the Weight Generator.
- Since we are doing a garment that was previously weighted to Classic Rigging, Select Move Weight Groups. This will move the weights from the SL Base Bone Weight maps to their corresponding Fitted mesh Weight maps for the Collision Volume Bones.
- If you want to get automatic weights for But, Pecs and Back then select the Generate Weights option as well.
- Press the Generate Weights Button.
option: Extra display settings
- I prefer to also change the Bone Display Style to:
- X-Ray
- disable shapes,
- disable Limits indicator
- enable Stick Display Style
- Use the blue SL Base bones to pose, and the red Collision Volume bones to paint weight onto.
- To update the weights while you’re painting, press alt-q to see changes to the mesh after you paint weight.
For unweighted mesh where you want both cBone weights and mBone vertex groups:
-
- Have your mesh and the Avastar figure and rig ready.
Note: It is advisable to model over the default shape. Once the model is complete and parented to the rig, with sliders attached, you can load the shape you want to use.
- Select your mesh and the rig. In the Skinning and Rigging panel, set Weight to Meshes.
Note: Step 2 is for copying initial weights. Remember that to use Meshes means you must have the Avastar figure meshes, or another mesh with weights such as the Avatar skirt or a pair of pants you weighted before), visible for the copying to occur. The mesh(es) you are using for weights must also be skinned to the same rig to which you are skinning your new mesh.
- Press the Assign Armature button. This changes the options for the next step. At this point both your mesh and rig are still selected and can stay selected for the next steps.
- For Fitted Mesh, press the plus sign by “Deform (Classic)…” to open the panel where the preset should be changed to Fitted.
- The deform panel has been updated to try and make it as simple as possible. First we want to change Weight to Swap. This will swap the weights from the mBones (SL) weights to the corresponding cBones (volume/collision). Now, here’s the important part: If you want to have the mBone groups to weight to, you will ALSO checkmark “Keep groups”. The mBone groups will be empty. You will have them though if you want to weight to any of them. You can delete any (in the vertex groups list) you don’t use. Apply configuration.
- The mesh is now ready for you to test with sliders. Go to the object properties and press “Load Shape Editor” if the sliders are not showing. At this point you can load an xml if you want to work with a different shape.
- When you are ready to proceed to weight painting, have your custom mesh selected and go to Show bones in the Avastar tab and enable Skinning. This will make the Deform bones visible: in this case the sl base (blue) and volume bones (orange octahedrons), and put you in the weight room.
- Enabling Stick will make the bones easier to work with.
- Use the SL blue bones to pose, and the volume red cbones to paint weight onto.
- To update the weights while you’re painting, press alt-q to see changes to the mesh after you paint weight.
- Have your mesh and the Avastar figure and rig ready.
What if you want to edit the mesh after you have set it up with sliders?
Workflow for Classic Rigging with Slink Feet
- Prepare your Slink Foot Lasts file (obtainable from Slink by filling out a form on their site) by opening it and selecting each pair of feet and detaching them from the rig through the Avastar Tab>Skinning panel. If you were to append these feet while attached to their armature, it would append with a copy of the rig as well which we are trying to avoi
- Save this file with some notation of “detached” or something to indicate you changed the original file and this way you don’t overwrite that file.
- Open a new file. My preference is to separate things out on layers to keep things clean and accessible.
- Leave layer 1 for the shoes you are modeling or have made.
- On layer 3, add a new Avastar.
- When you add avastar, the rig is selected and is in green. Press M for the Layer mover and press in the second box to place the rig on the second layer. You now have three layers populated: Layer 1- your model, Layer 2- the Avastar rig, Layer 3- the Avastar meshes.
- The layers on the bottom row in the Layers icon (in the 3d view menus) are layers 11-20. Left click layer 11.
- Now go to File>Append.
- Navigate to your Slink Foot Last file and open the Object category and find SlinkFemaleFeetFlatLLASTS, select it and load it. It should be in layer 11. Do the same with the other feet and place them into layers 12, 13 and 14 respectively. Remember that to see more than one layer at the same time, you select your first layer and then shift select whatever other layers you want visible.
- These feet are not prepared for use with Avastar yet as they face forward when you are in Right Ortho, but Avastar faces front in Front Ortho. Select layers 11, 12, 13 and 14 and box select (letter B for box lasso) over the four sets of feet to select them.
- Rotate all the feet RZ-90 to face them forward in front view.
- Ctrl-A and select apply rotation. When you do this, it will appear that one side of the feet appear to be over the other foot and face in the opposite direction. This is because there is a mirror modifier on each pair of feet.
- Select each foot layer and, with those feet selected, go to the Modifiers panel (wrench icon) in the Properties panels (that have the row of icons beginning with the camera for Render).
- Under the mirror modifier, change the axis from Y to X. Do this to each set of feet.
- You now need to get your feet onto the new avastar rig. Select the feet on layer 11 and shift select the avastar rig on layer 2. The feet already have weights so we will not be changing the weights.
- In the Avastar tab>Skinning, set Weight to Keep. The options on the panel will change and you will leave the new options both disabled (not checkmarked).
- Press Bind To Armature. Your feet are now set up with a new Avastar rig and ready to use. Repeat this with each set of feet (or at least the feet you intend to work with in this file).
- Have your mesh, the Slink feet, and Avastar figure (if needed), and rig ready.
- Select your mesh and the rig. In the Skinning panel, set Weight to Meshes.
- Clear Weights and Interpolate should be on by default. Uncheck Sliders if check-marked.
Note: Remember Weight from Meshes is from any visible and unselected meshes, so in this case the weight will come from the Slink feet meshes and if you need some weights from the Avastar legs, you can have the lower body mesh visible. The mesh(es) you are using for weights must also be skinned to the same rig to which you are skinning your new mesh.
Press the Bind to Armature button.
- Go to Show bones in the Avastar tab and enable Skinning. This will make the Deform bones visible (in this case, the SL Base (blue)), and put you in the weight room.
- Enabling Stick will make the bones easier to work with. You can now proceed with testing the mesh with poses an adjusting weights.
There are other presets in the lists for setting up weights. Hovering over each preset in the list will tell you what it does. If you have questions about these other presets, you can ask in the Blender Avastar group in Second life and we will try to explain or work out the workflow for them. Happy Meshing, ~ele
